Lebanese delicacy – Hashweh and baked Zaatar chicken

1

Chefs across Boundaries is a wonderful group of foodie chefs who come together once a month to experiment with different cuisines. Garima www.cafegarima.wordpress.com hosted the theme for the month which was Lebanese.

Lebanese cuisine is an ancient one and part of the Levantine cuisine, which includes Egyptian cuisine, Palestinian cuisine, Syrian cuisine etc.

IMG_0569

Many dishes in the Lebanese cuisine can be traced back to thousands of years to Roman, and even Phoenician times. For most of its recent past, Lebanon has been ruled by foreign powers that have influenced the types of food the Lebanese ate. From 1516 to 1918, the Ottoman Turks controlled Lebanon and introduced a variety of foods that have become staples in the Lebanese diet, such as cooking with lamb. (source – wikipedia)

IMG_0567

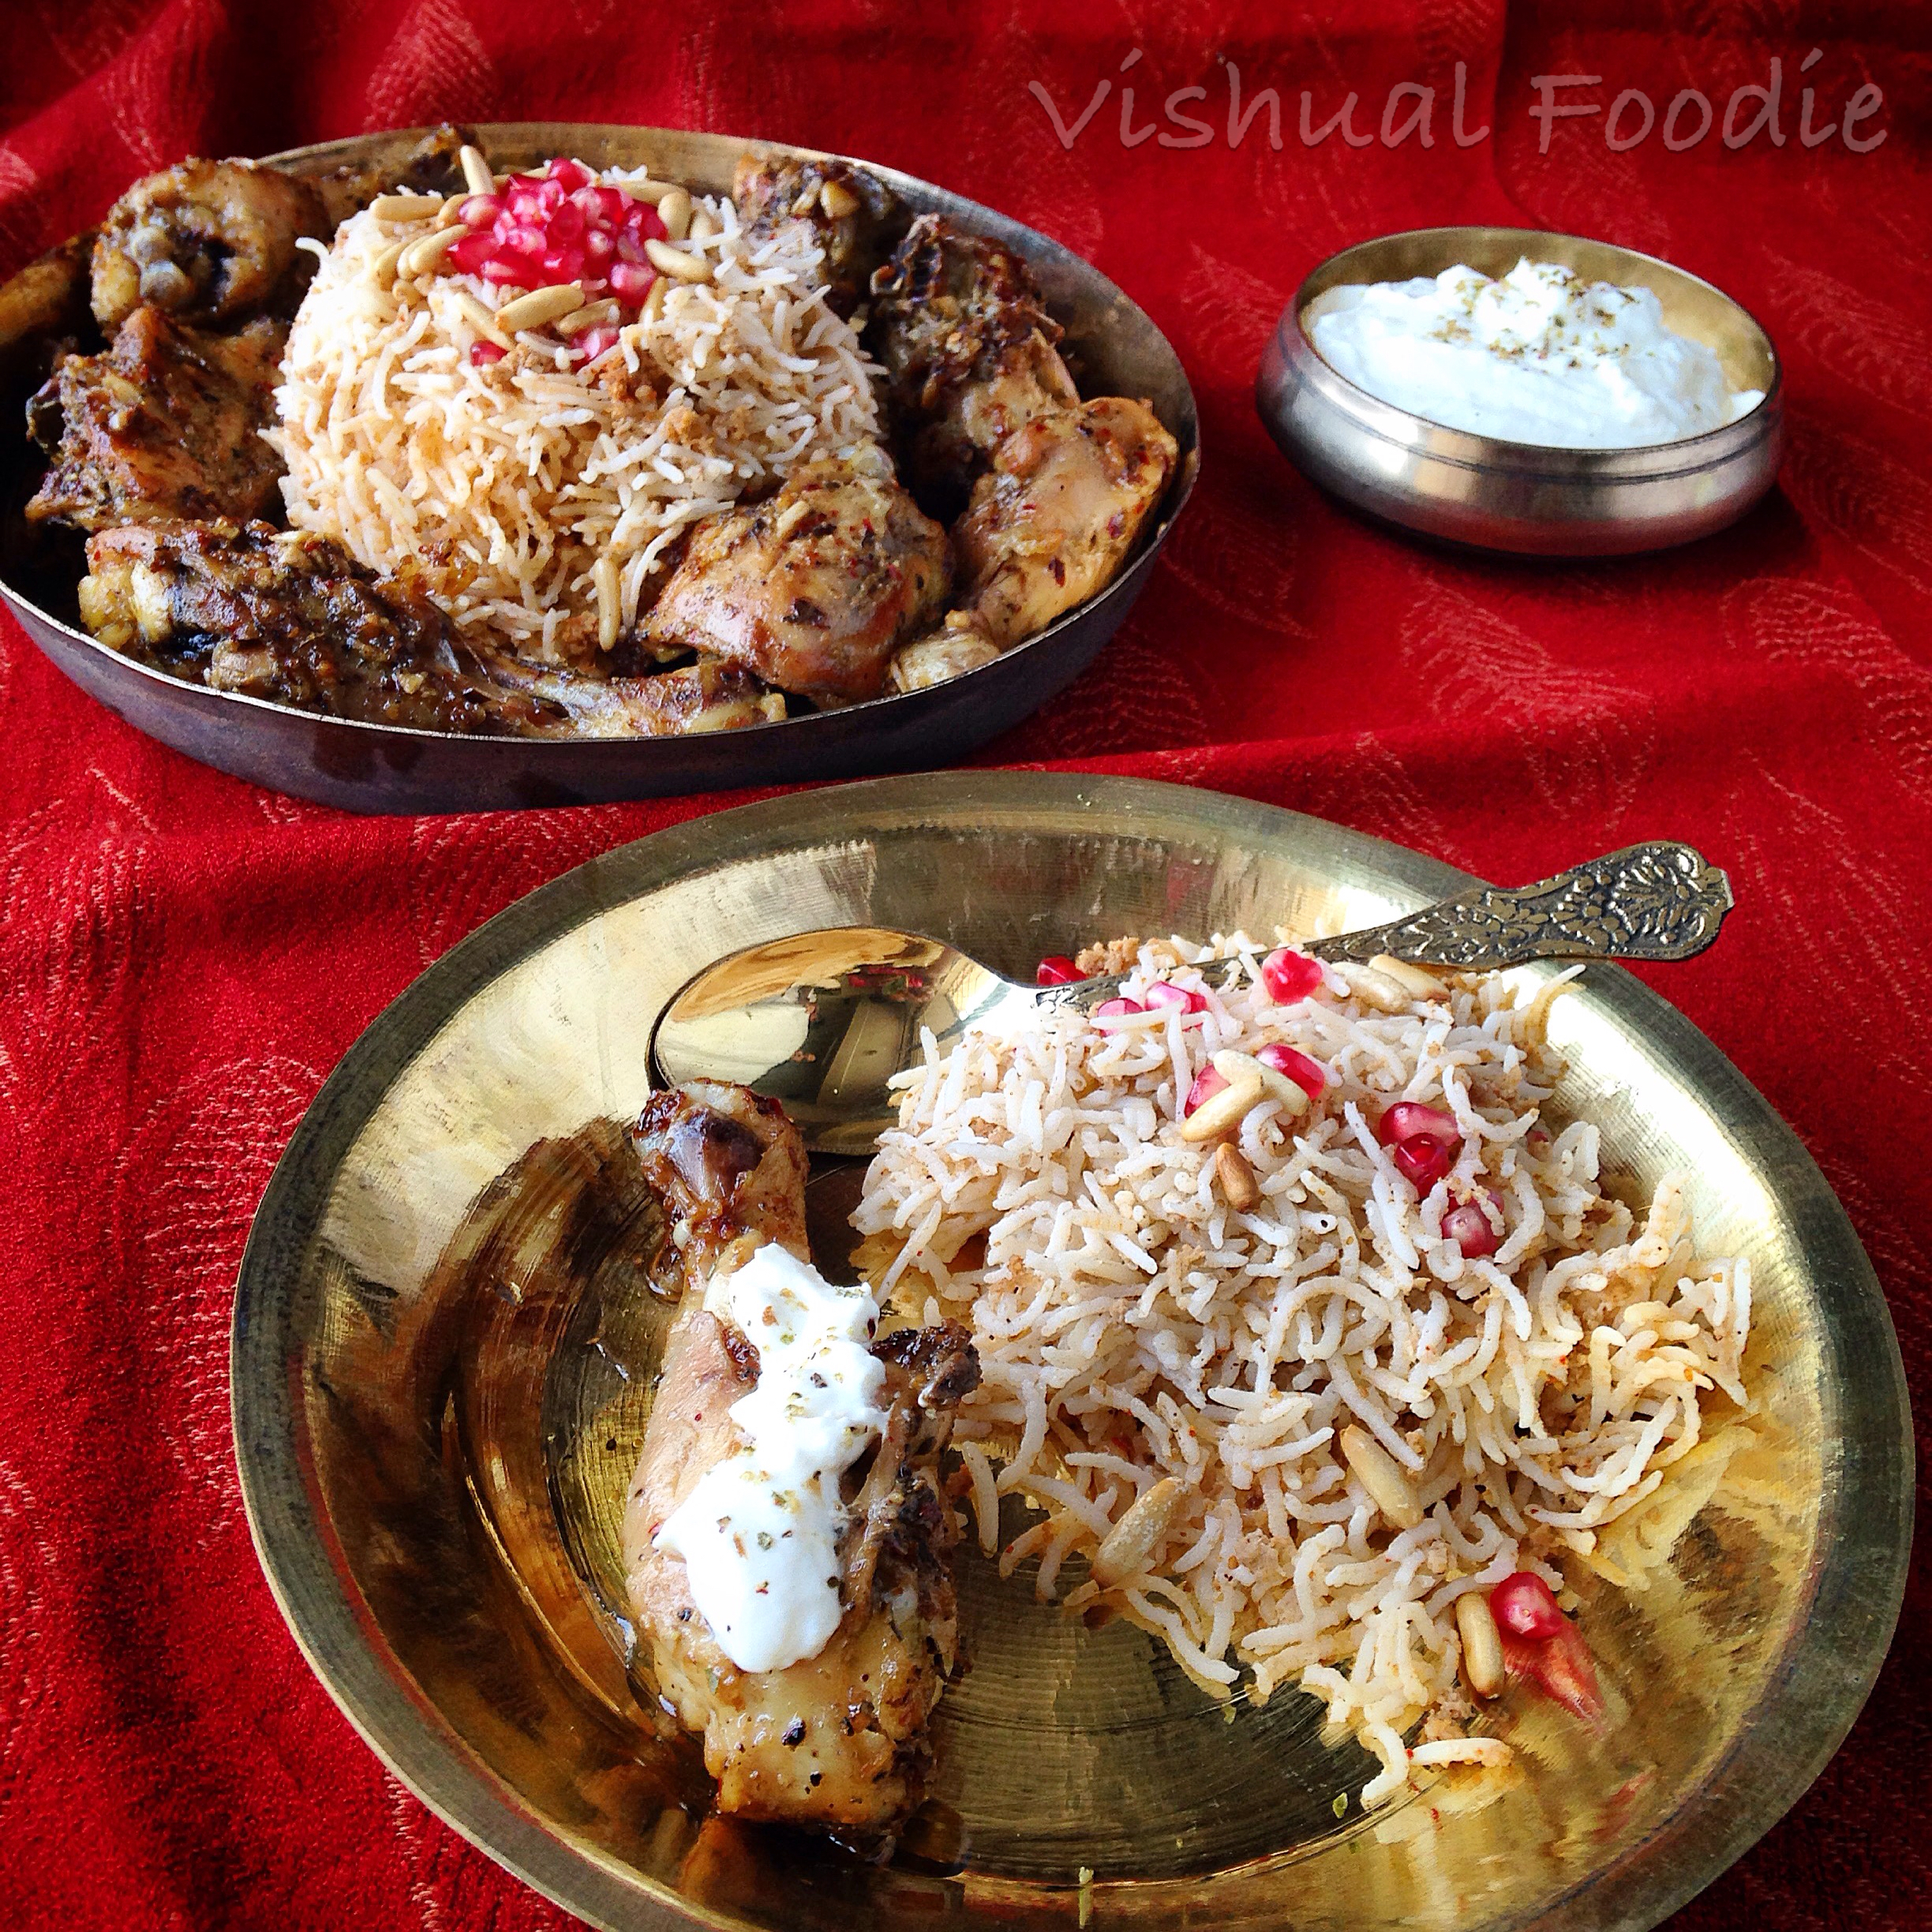
I have always been fascinated with the Lebanese feast pictures with so many tantalising dishes on display. When I decided to attempt Lebanese cuisine, I happily made a huge list of dishes, breads and dips and thought am gonna go all out this time. Then the heat wave hit and I knew that there is no way I could muster up the stamina for such a huge spread, but the idea of a feast wouldn’t leave my mind. I had these amazing spice mixes that i had bought from Delhi which were perfect for these flavours so did some research and came across a simple Hashweh recipe and thought why not make a sharing plate with some baked chicken and a yoghurt dip on the side.  With the flavour profiles in my mind, created my own simple recipes.

IMG_0568

For Za’atar baked chicken:

1 kg chicken legs cut into big pieces

1/2 cup Olive oil

4 cloves of crushed garlic

1 tsp salt

Juice from 1/2 – 1 lemon

2 heaping tsp Za’atar

1/2 tsp red chilli flakes


  1. Mix all the ingredients in the oil. Adjust seasoning
  2. Rub each piece of chicken all over with the mixture and marinate it overnight.
  3. In one layer, place the chicken on a greased baking dish.  Cover with foil.
  4. Bake in a pre heated oven at 180 degrees C for 30 minutes, covered.
  5. Remove foil, and bake another 20-30 minutes (approx.). Till chicken is cooked (baste with the juices from the pan when u remove the foil to cook)
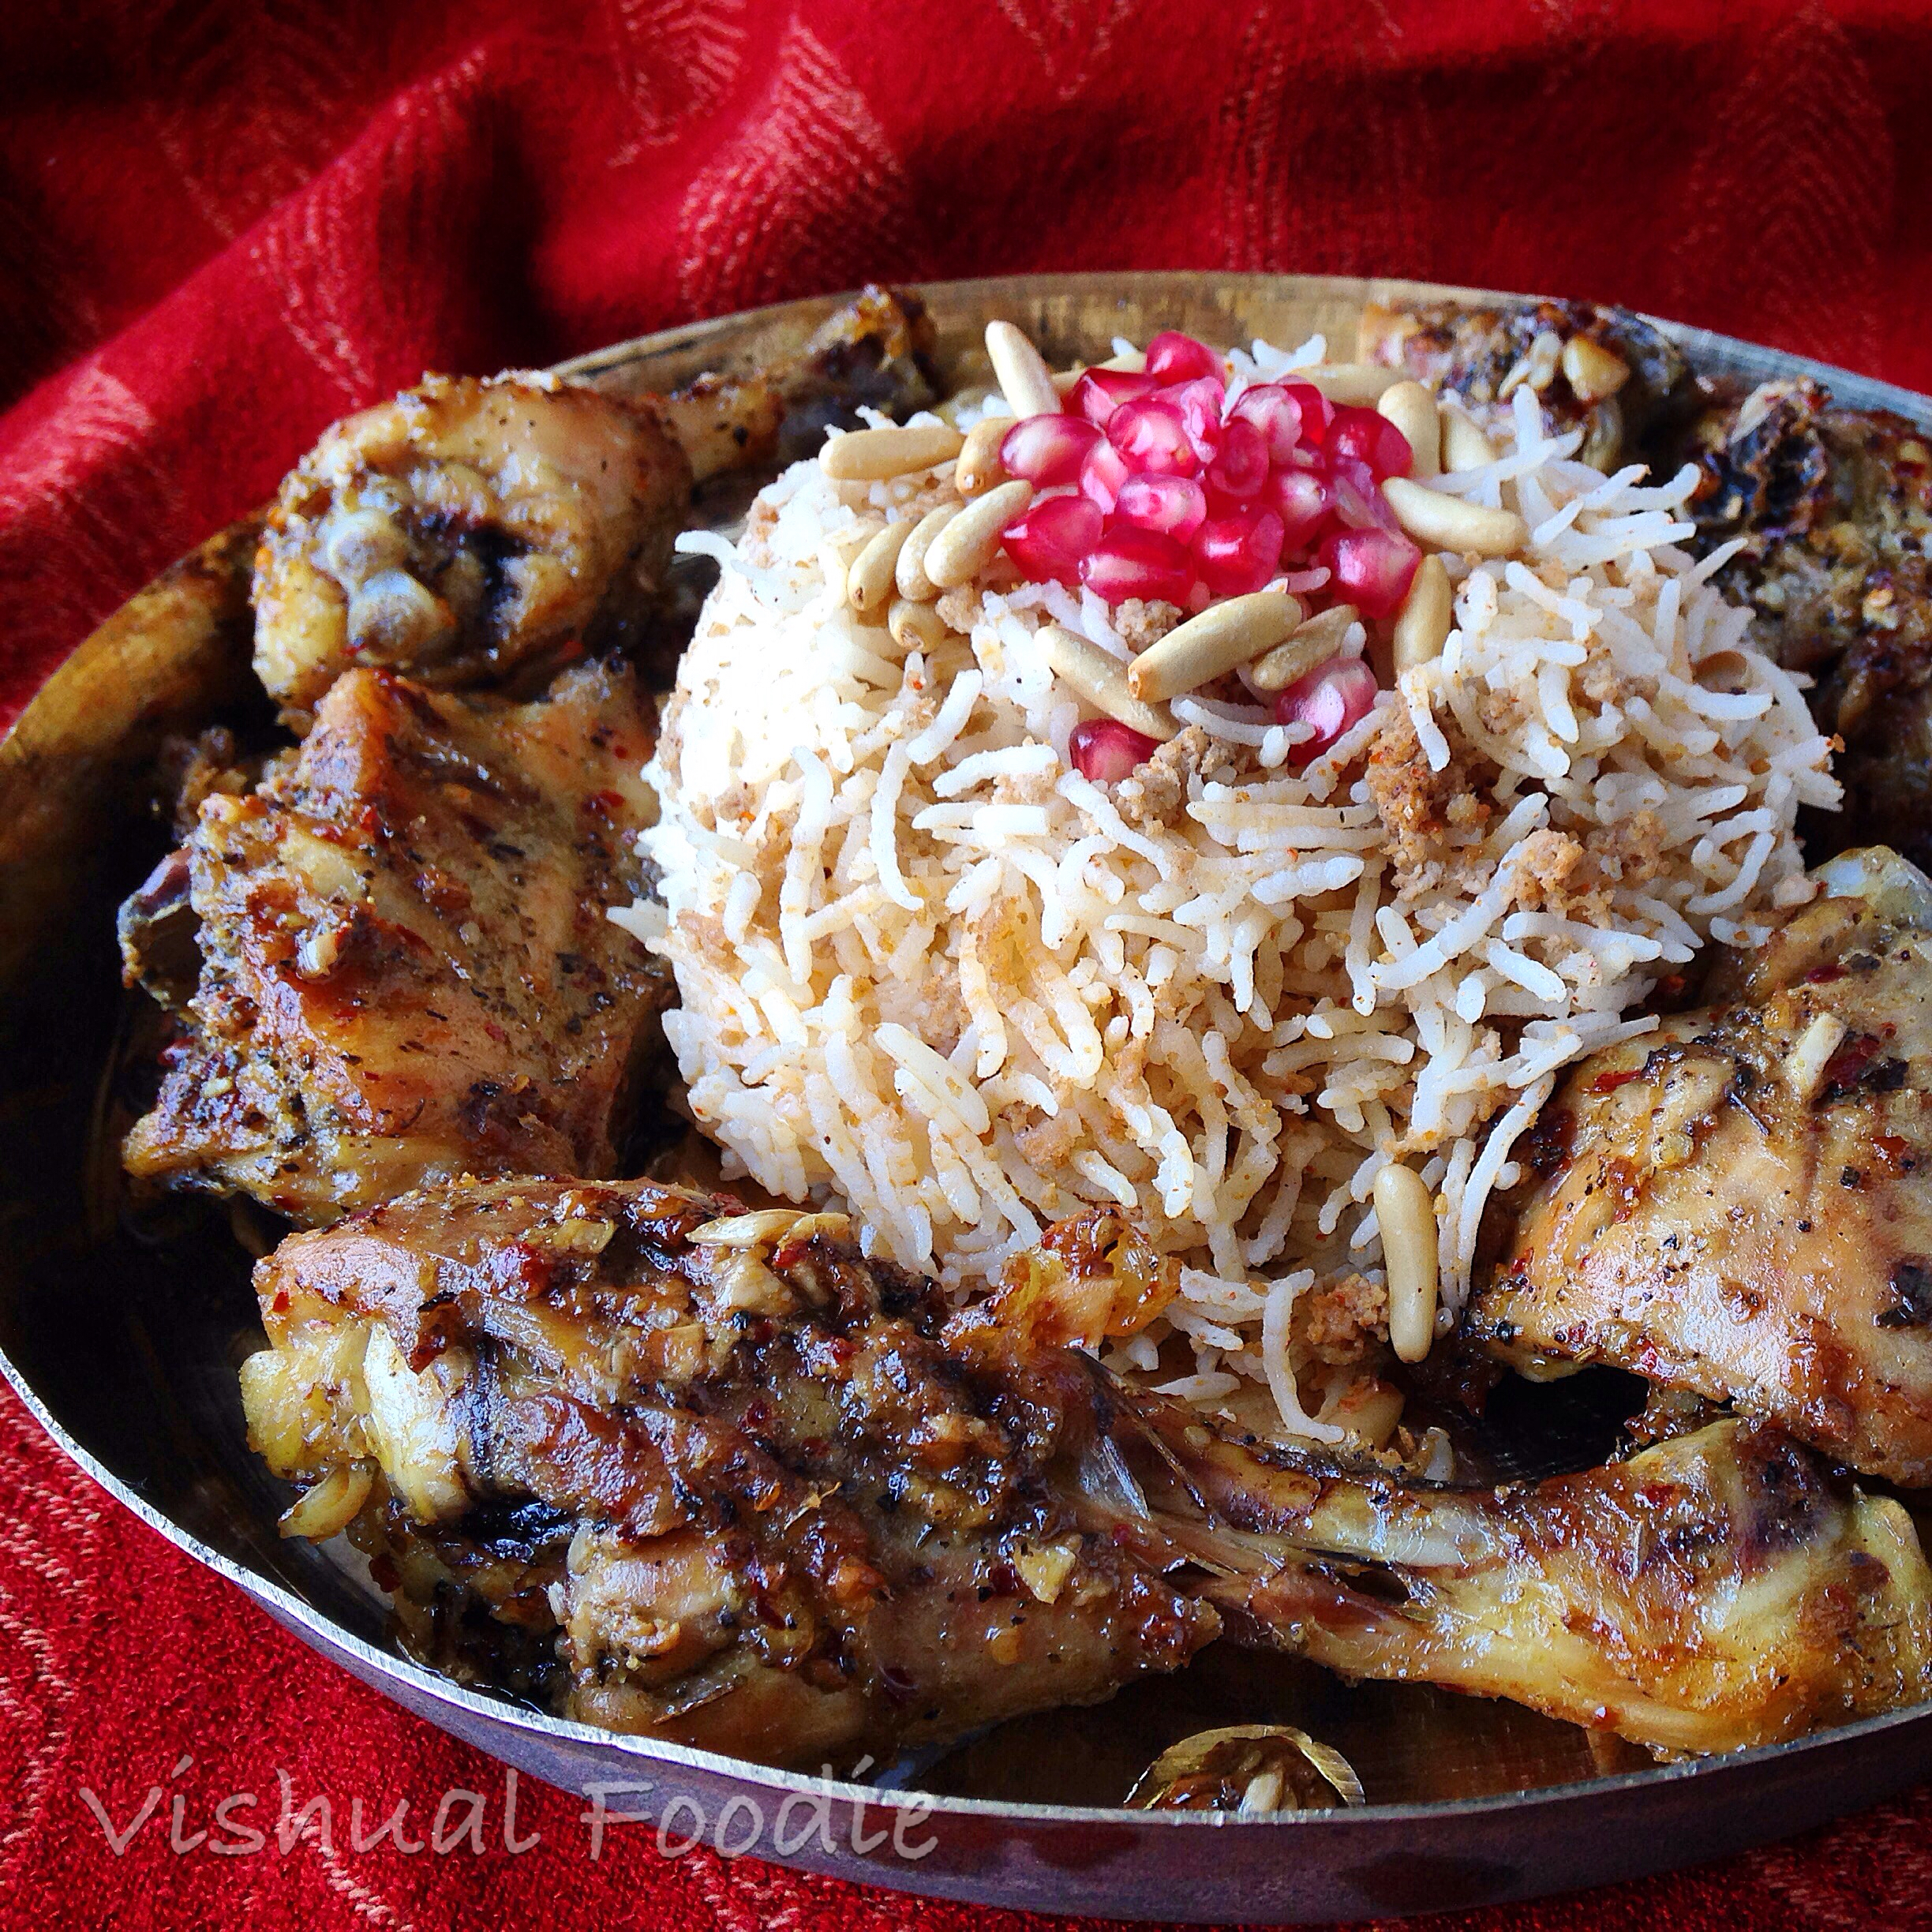
 

For Hashweh:

1/4 cup butter

1/4 cup pine nuts

450 gms mutton mince

1 tsp salt

1 tbsp Ras Al Hanout spice mix

1/2 tbsp paprika powder

1 cup basmati rice (washed and soaked for 30 mins)

2 cups water + 3-4 tbsp of the chicken juices from the Za’atar baked chicken

1/4 cup pomegranate seeds (for garnish)

1/2 tsp cinnamon (for garnish)

few toasted Pine nuts (for garnish)


  1. Melt butter in large pot and add pine nuts. Stir regularly until the pine nuts brown or turn golden (be careful, as once the pine nuts start turning brown, they will burn quickly afterwards). Remove from heat immediately.
  2. Add mince and return back to burner on medium high. Break up the meat finely with wooden spoon.
  3. Add salt and spices, while browning meat, and mix thoroughly.
  4. Once meat is browned, add the rice and stir together.
  5. At this stage, the chicken will have been cooking for about 30 minutes and will have just come out of the oven to remove the foil. Collect the chicken pan juices and add the 3-4 tbsp juices to the rice mixture before returning the chicken back to oven to continue cooking uncovered.
  6. After adding pan juices to rice, add the water and stir. Cover pot and bring to boiling, then simmer for 15 minutes or until rice is cooked. Garnish with pomegranate seeds, sprinkled pine nuts and ground cinnamon.


Yoghurt Dip

1 box of Brittania curd

2-3 tbsp Amul cream

1/2 lime

salt

2-3 crushed minced garlic

1/2 tsp Za’atar


  1. Hang curd for 1 hr
  2. Mix all the ingredients except the Zaatar, adjust seasoning
  3. sprinkle the Za’atar mix on top and serve it with the chicken

Khus Khus Malai chicken

IMG_0539

Whenever I want to try some new Indian chicken dishes, I usually refer to recipes from a foodie chef Jaspreet Nirula. This time I chose the Khus Khus Malai chicken and didn’t realise what i was getting into.

IMG_0538

This recipe asked for quite an elaborate process, First the thinly sliced onions had to be fried just right, then the masalas had to be ground well and cooked at various stages. And the finale ended with a dum style of cooking to extract the maximum flavour from the dish. The dish is super delicious and a must try to impress your guests.

IMG_0537

Ingredients

Chicken 700gm
Oil 1/2 cup
Cloves 7-8 nos
Cumin 1tsp
Onions thinly sliced 3-4 medium
Tomatoes 4 medium (deseed and make puree)
Green Chillies 2nos
Khus Khus 1/2 cup (soaked in warm water for 30 mins)
Malai 3tbsp
Degi Mirch 2tsp
Chicken Masala Powder 2tsp
Garam Masala powder 1tsp
Salt to taste
Green Corriander chopped – 2tbsp for paste
Ghee 2tbsp


  1. Make a fine paste of Khus Khus, green chillies and coriander leaves. Keep aside
  2. Wipe the onions with a cloth and sprinkle some salt on it. Deep fry sliced onions to golden brown in color (be careful not to burn the onions, else they will taste bitter. Reserve the oil.
  3. In the same oil add cloves and cumin seeds, then add tomato puree and stir for a couple of minutes.
  4. Add degi mirch, chicken masala and salt. Mix well and keep stirring for 5 minutes.
  5. Add the khus khus paste to the tomato masala and mix well. Bhunno the masala till the oil separates. Keep stirring time to time. Make sure the heat is medium during this entire process.
  6. Now add Chicken and mix well. Bhunno it along with masala for 3-4 minutes and lower the heat.
  7. Now add 3/4th of fried onions – crush them with your hands and add over the chicken. Mix well and stir for a minute or so. Now add some water (enough for the chicken to cook). Adjust seasoning and cover the utensil and cook chicken on a low flame.
  8. Once the chicken is almost done, remove from flame and add malai. Mix in well. Adjust seasoning.
  9. Put the entire chicken with gravy in a degchi (for dum) – sprinkle remaining fried onions and green coriander and blobs of ghee – cover and seal the degchi with dough and put it on dum on a griddle(tawa) on a low heat for 15 minutes approx.
  10. Remove the seal and mix the chicken well and serve hot.

Boozy Chocolate Mousse

IMG_0503

I got an order for chocolate mousse from a friend of mine for later this week. I gladly said yes of course and then began to panic.

IMG_0504

Had never made mousse before and now had to do a trial before I made it for the order. Searched the net, read books, asked friends but was quite confused. So many different techniques – cooking, whipping, gelatin and what not.

IMG_0507

Then remembered I had saved a recipe a while back. It was a boozy recipe, just my kind of dessert. I thought for the trial will do the boozy one and for the order will make it without. Needed to test the taste and texture, so made it today.

IMG_0506


It’s Rhea Mitra Dalal’s recipe (www.euphoRHEA.blogspot.in) with no cream, very little sugar and made light and airy with the way the eggs are treated. Absolutely delicious.

IMG_0508

Ingredients

Morde pure chocolate – 250 gms
3 tsp castor sugar
6 eggs
Cointreau – 2 tsps (if u do not want to use alcohol, add 2 tsp of vanilla extract)
Dried candied orange peel, whipped cream and sprinkles for garnish


  1. Melt the chocolate in a double boiler (put a bowl with the chocolate in it on top of a saucepan with simmering water. Ensure that no water gets into the chocolate).
  2. In one of the mixing bowls measure out the cointreau and 2 tsp sugar.
  3. In the other put 1 tsp sugar.
  4. Separate the eggs putting the yolks with the cointreau and sugar and the whites in the other bowl. Make sure that the whites have no trace absolutely of any yolk. Separate the eggs individually in a small bowl and then add into the large bowls. This ensures that in case a yolk breaks the entire batch of whites is not ruined.
  5. Once the eggs are separated, add the melted chocolate to the egg yolks and beat till smooth.
  6. Clean the beaters thoroughly and wipe clean. Beat the egg whites till firm peaks form.
  7. Fold in the egg whites into the chocolate mixture using vertical circular movements with the large spoon. Don’t stir as if you’re cooking curry!! Fold in gradually incorporating as much air as you can. Scrape clean using a the spatula.
  8. Pour mousse into a clean glass bowl, cover with foil or plastic wrap and refrigerate to set. The mousse will be set in a couple of hours.
  9. Garnish with chocolate sprinkles and candied orange peel and  or whipped cream.Note – This recipe gives you about a litre of mousse…enough for about 8 people. You can use liqueurs like Schnapps, Kirsch, Pear liqueur, Coffee liqueur, Cointreau…whatever you like

Recipe – Rhea Mitra Dalal

IMG_0505

Cake Pops

IMG_0384

Last week’s bakes left me with quite a few chocolate cake trimmings. Was wondering what to do with them and then thought why not cake pops?

IMG_0385

Had the whole thing worked out in my mind and this morning when I opened the fridge to remove the trimmings, saw that the box was half empty. Could barely make 3 pops from them. Investigations revealed my husband was the cake thief.

IMG_0386

Now my mind was set on the pops so quickly made a few cupcakes and patiently waited for them to cool. Made the pops and covered them with coloured white chocolate. Different hues of blue to match the gorgeous summer sky.


Ingredients (Makes 8-9 pops)


2 1/2 cups chocolate sponge cake (u can use trimmings or leftovers)

2-3 tbsp chocolate ganache (2:1 ratio of melted chocolate:cream with a spoon of butter)

lollypop sticks

300 gms white chocolate

candy colour of your choice (i used Wilton Blue)

sprinkles


  1. Crumble the cake to make fine crumbs.
  2. Mix 2 tbsp of chocolate ganache to make a binding dough. Judge the consistency, Don’t make it too wet else they will leave water later.
  3. Make balls out of the dough and lay them away from each other on a baking sheet or tray. keep in the fridge for 30 mins.
  4. Melt little white chocolate, dip the ridged end of the stick in the white chocolate and poke it in the cake balls.
  5. Once all are done, keep in the fridge for 1 hr.
  6. Melt the remaining white chocolate in the double boiler and once completely melted, add the colour of your choice. Just dip a toothpick in your colour and mix it in the chocolate, adjust shade as per your preference.
  7. Dip 1 cake ball in the chocolate to coat well, allow few seconds to drip of excess chocolate and immediately cover in sprinkles of your choice. Do not wait longer as the chocolate will harden up immediately. Repeat process with all other pops.
  8. Leave out to air dry, ensuring they are not touching each other,  Ready to serve in 10 mins.


Cucumber boats – The Far Away Sails

IMG_0320

Presenting THE FAR AWAY SAILS

Cucumber boats stuffed with hung yoghurt, corn and spinach, spices like Zaatar, Chilli flakes with aromatics of dried rose petals and pistachios.

IMG_0322

Every bite u take, the aroma of the rose petals is such a wonderful effect. My son loved them. Perfect for the summer heat.

IMG_0323

Ingredients

1 box Brittania yoghurt
1 cup sweet corn
1/2 bundle spinach

2 minced garlic 
Salt
1/4 tsp red chilli flakes
1/2 lime
Pinch Zaatar
crushed dried rose petals
Crushed pistachios 

2 big fat cucumbers


1) hang yoghurt for 1 hour in a Muslin cloth
2) boil sweet corn and when nearly done, add chopped spinach and shut the gas. Let it blanch for a minute and then drain
3) Whisk the hung yoghurt and add corn, spinach, lime, salt, Zaatar, Chilli flakes and chill it in the fridge.
4) cut the cucumber half lengthwise and scoop out the seeds making a hollow boat. Leave the skin on, it gives a nice crunch.
5) spoon in the curd mix and sprinkle rose petals and pistas. Serve cold.

Eggless chocolate cake with candied orange peel

IMG_0207

A long pending promise to my friends daughter Saima finally saw the results today.

My first attempt to teach baking to someone, actually resulted in some hiccups but my student passed with flying colours. The ganache was either to runny or too stiff and the piping was giving us lots of trouble. But we did not give up and the pics speak for itself.

IMG_0205

We baked an eggless chocolate cake and infused it with orange syrup. Saima has decorated the cake herself with chocolate ganache and a side sprinkle of hazelnuts. The candied orange peel I had made at home.

IMG_0204 1

Ingredients

All purpose flour – 1 ½ cups

Castor Sugar – 1 cup

Cocoa powder – ⅓ cup

Baking soda – 1 teaspoon

Salt – ½ teaspoon

Water – 1 cup

Oil – ½ cup

Pure Vanilla Extract – 1 teaspoon

Apple cider Vinegar – 1 tablespoon

Orange Syrup

Chopped Hazelnuts

 Chocolate Orange cake

Chocolate Ganache:

Dark Chocolate 2 cups (chopped)

Heavy Cream 1 cup

Butter 2 tbsp

Candied Orange Peel

3 oranges

1 cup sugar

Chocolate Orange cake

Candied Orange Peel

  1. Using a vegetable peeler, shred long strips of orange peel without the white pith, just the orange part.

  2. Place strips in a medium saucepan. Cover with cold water, and bring to a boil over medium heat. Drain; repeat two more times with fresh water.

  3. Place sugar in a clean saucepan with 1 1/2 cups water; stir to combine. Bring to a boil over medium heat, stirring occasionally, until sugar has dissolved, about 3 minutes. Add the citrus strips to the boiling syrup; reduce heat, and simmer until strips are translucent, about 12 minutes. Remove from heat; let strips cool in syrup, at least 1 hour. Remove from syrup when ready to use.

  4. Reserve the syrup to moisten the cake.


Cake:

  1. Preheat oven to 180 degrees..
  2. Line and dust a 7″ tin.
  3. Mix all dry ingredients (All purpose flour, sugar, cocoa powder, baking soda and salt) in a bowl. Pass them through a sieve first
  4. In another bowl mix all wet ingredients (water, oil, vanilla extract and vinegar). Add wet mixture to flour mixture.
  5. And mix till it well blended together. Do not over mix.
  6. Pour the batter in the tin and tap it once to remove the bubbles.
  7. Bake in pre-heated oven for about 30-35 minutes or till toothpick inserted comes out clean.
  8. Remove it from oven and let it cool completely.
  9. Using a silicon brush, sprinkle a little syrup over the cake and allow it to soak in. Repeat after 10 minutes.
  10. Apply a generous coat of ganache, covering each side of the cake. Keep it in the fridge for 20 mins.
  11. Decorate the sides of the cake with chopped hazelnuts.
  12. Chop the candied peel and use it to decorate the cake.
  13. Keep the cake in a refrigerator for 2 hours before serving.


Salted Caramel Mousse cake

IMG_5751

Chocolate cakes are in demand and when I asked the birthday girl what she wanted, she prompltly replied chocolate.

IMG_5752

I recently made a salted caramel sauce using Kiran Tarun’s recipe (www.kirantarun.com)  and knew I wanted to use it in a cake. The chocolate sponge was from Nidhis blog (www.soulandspicebox.com). I made a chocolate cake with a salted caramel mousse filling and a frosting of milk chocolate and salted caramel ganache. Sinful. Perfect for chocolate lovers

IMG_5753

Ingredients

Cake:

All purpose Flour – 100 gms ( 1 cup)

Powdered sugar – 160 gms ( 1 1/2 cups)

Eggs – 4

Butter – 100 gms

Cocoa powder – 6 tbsp

Thick Curd – 4 tbsp

Baking  powder – 1 tsp

Vanilla Essence – 1 tbsp

Butterscotch bits – 1/4 cup

Almond slivers – 1/4 cup


Dark Chocolate Ganache

500 gms dark chocolate

1 pkt (200 gms) Amul Cream

2 tbsp butter


Salted Caramel Sauce:

1.5 cups granulated sugar

1/3 cup water

4 tbsp butter, cubed and room temperature

1/2 cup heavy cream, room temperature

1 tsp sea salt

1 tsp vanilla extract


Salted Caramel Ganache Mousse

Dark chocolate ganache – 1/2 cup

Salted Caramel Sauce – 1/4 cup

whipped cream – 1/2 cup


For the sugar syrup:

Powdered sugar/ icing sugar – 3 tbsp

Water -1/2 cup


Method:

Cake:


  1. Grease and dust a 7 inch baking tin and pre heat the oven to 180 C.
  2. Sieve the all purpose flour, cocoa powder, baking powder and set them aside.
  3. In a bowl, add the butter and sugar and whip them till they are well combined.
  4. Add the eggs 2 at a time and whip the batter well.
  5. Add the vanilla essence and whip it once more.
  6. Slowly add the dry ingredients and keep whipping.
  7. Add the thick curd and mix it well. Pour the batter in the pan and tap it to remove air bubbles.
  8. Bake the cake at 180 C for 30 minutes or till a toothpick comes out clean.
  9. When cool, slice it horizontally to get 2 pieces
  10. Make the sugar syrup by combining ingredients listed under sugar syrup and use a silicon brush to dizzle it over both the cakes.

Dark Chocolate Ganache


  1. Chop the chocolate to small even pieces
  2. Heat the Amul cream in a pan, when it just starts to bubble shut the gas.
  3. Mix the butter with the cream and pour this mix over the chocolate.
  4. Leave it for 3-4 minutes and then mix well. Let it rest for a couple of hours.


Salted Caramel Sauce: 


  1. Add water and granulated sugar into a saucepan. Heat saucepan over medium-high.
  2. RESIST any attempt to stir with a spatula or wooden spoon while sugar melts. Let it do its thing. It’ll bubble vigorously but DON’T be tempted to stick a wooden spoon to STIR. DON’T DO IT. You’d only risk a huge clump of mess! Crystalized sugar, no bueno.
  3. Instead, swirl the saucepan once or twice to evenly melt sugar and caramelize. Do not over-do it.
  4. Once sugar caramelizes into a nice dark amber shade, remove saucepan from heat and carefully drizzle in cubes of softened butter and cream. With a wooden spoon, continue whisking even though it looks like everything would bubble over, but trust me, it will settle. Just continue whisking, carefully and AVOID BURNS.
  5. DO NOT STICK YOUR FINGERS IN FOR TASTE. You will be awarded with 3rd degree burns. No joke.
  6. Once caramel is pourable, whisk in fleur de sel and vanilla extract. Store salted caramel sauce in airtight jars for up to a week.

Salted Caramel Ganache Mousse:


  1. Add the salted caramel sauce to the ganache and whisk it.
  2. Add the whipped cream and fold it in. Keep it in the fridge for 15 mins to firm up.


Cake Assembly:


  1. To assemble the cake, pour a thick layer of salted caramel mousse over one layer of cake. Add butterscotch bits. Place the other cake on top and press it lightly.
  2. Use a spoon and offset spatula to spread the chocolate ganache evenly on the top and sides of the cake.
  3. Keep it in the fridge for 30 mins
  4. slowly pour the salted caramel sauce on the edges of the cake allowing it to drip on the sides.
  5. Use the leftover mousse to pipe rosettes. Garnish with some almond slivers.
  6. Refrigerate for 2 hrs before serving.


Ferrero Rocher Cake

IMG_4869

Am so glad I finally can bake a cake. It’s a different feeling all together when u bake a cake yourself for friends and family

It’s my bestie, chuddy buddy, darlings birthday and she wanted a chocolate cake. I was sure i didn’t want a simple chocolate cake so decided to make a Ferrero Rocher cake using my foodie bestie Nidhis recipe. (www.soulandspicebox.com). A hazelnut filled chocolate sponge with a ganache loaded with Nutella and multiple Ferrero Rocher to decorate the cake. Who couldn’t fall head over heels in love.

IMG_4870

Recipe from Nidhi’s blog (as i made it)

Ingredients:

For the cake:

All purpose Flour – 100 gms ( 1 cup)

Powdered sugar – 160 gms ( 1 1/2 cups)

Eggs – 4

Butter – 100 gms

Cocoa powder – 6 tbsp

Thick Curd – 4 tbsp

Baking  powder – 1 tsp

Roasted Hazelnuts – 1/2 cup ( chopped)

Vanilla Extract – 1 tbsp


For the Nutella Dark Chocolate Ganache: 

Dark Chocolate – 2 cups (chopped)

Cream – 3/4 cup ( I used amul)

Nutella – 1/2 cup


For the sugar syrup:

Powdered sugar/ icing sugar – 3 tbsp

Water -1/2 cup


For garnishing:

Roasted Hazelnuts – 1/2 cup ( chopped)

Ferrero Rocher Chocolates


Method:

  1. Grease and dust a 7 inch baking tin and pre heat the oven to 180 C.
  2. Sieve the all purpose flour, cocoa powder, baking powder and set them aside.
  3. In a bowl, add the butter and sugar and whip them till they are well combined.
  4. Add the eggs 2 at a time and whip the batter well.
  5. Add the vanilla essence and whip it once more.
  6. Slowly add the dry ingredients and keep whipping.
  7. Add the thick curd, chopped hazelnuts and mix it well. Pour the batter in the pan and tap it to remove air bubbles.
  8. Bake the cake at 180 C for 30 minutes or till a toothpick comes out clean.
  9. When cool, slice it horizontally to get 2 pieces
  10. Make the sugar syrup by combining ingredients listed under sugar syrup and use a silicon brush to dizzle it over both the cakes.
  11. To make the nutella dark chocolate ganache, chop the dark chocolate into small pieces.
  12. Heat the cream till it comes to a bubble and pour it over the chocolate. Add the nutella and let it rest for 5 minutes.
  13. Use a hand whisk to mix it ganache well. Make sure there are no lumps. Refrigerate the ganache for 15 minutes before use.
  14. To assemble the cake, pour 2-3 tbsp of ganache over once piece of cake. Place the other cake on top and press it well.
  15. Use a spoon and offset spatula to spread the ganache evenly on the top and sides of the cake.
  16. PS – If the ganache gets too sticky – Boil 2 cups of water in a pan. After every few strokes with the offset spatula, dip the spatula in the hot water and wipe it clean. Smoothen the ganache with the hot spatula to get a perfect finish.
  17. Press 1/2 cup of chopped hazelnuts on the sides of the cake.
  18. Use the left over ganache, hazelnuts and Ferrero Rochers to decorate the cake.
  19. Refrigerate the cake for 2 hours before serving.


Brown butter chocochip cookies with sea salt and Nutella

IMG_0119

My secret obsession with Nutella is now out in the public. I keep thinking how can I incorporate it in all my desserts. A while ago I had seen a pic of this cookie and it just would creep up in my dreams and cravings. I couldn’t wait to make it.

IMG_0121

After searching for a recipe I could work with, I bookmarked it for the future. Recently I went away on a trip and when I got back I was in no mood to cook. I really wanted to but lethargy overtook everything else.

IMG_0122

Last night I decided that after a 2 week break, enough is enough. I have to make something and this is the perfect dish to start again with.

A comfortable nook, a magical book, some cold milk and these gooey cookies. Life is good ain’t it.

IMG_0120

Ingredients


2 1/4 cup all-purpose flour

1 1/4 teaspoons baking soda

1 cup Amul butter

1 1/4 cup packed dark brown sugar

1/4 cup granulated sugar

1 large egg plus 1 egg yolk

1 1/2 teaspoons vanilla extract

1 tablespoon yogurt

3/4 cup semi-sweet chocolate chunks

1/2 cup dark chocolate chips

1 jar of Nutella, chilled in refrigerator

Coarse sea salt for sprinkling

Instructions
  1. Whisk together the flour and baking soda in a bowl and set aside. Melt butter in a saucepan over medium heat. The butter will begin to foam. Make sure you whisk consistently during this process. After a couple of minutes, the butter will begin to brown on the bottom of the saucepan; continue to whisk and remove from heat as soon as the butter begins to brown and give off a nutty aroma. Immediately transfer the butter to a bowl to prevent burning. Set aside to cool for a few minutes.
  2. With an electric mixer, mix the butter and sugars until thoroughly blended. Beat in the egg, yolk, vanilla, and yogurt until combined. Add the dry ingredients slowly and beat on low-speed just until combined. Gently fold in all of the chocolate chips.
  3. Chill your dough for 2 hours in the refrigerator.
  4. Preheat the oven to 175 degrees C. Once dough is chilled measure about 1 1/2 tablespoons of dough and roll into a ball. Flatten the dough ball very thinly into the palm of your hand. Place 1 teaspoon of chilled nutella in the middle and fold dough around it; gently roll into a ball — it doesn’t have to be perfectly rolled! Make sure that the nutella is not seeping out of the dough. Add more dough if necessary. Place dough balls on cookie sheet, 2 inches apart and flatten with your hand VERY gently. (Really only the tops need to be flattened a bit!)
  5. Bake the cookies 10-11 minutes or until the edges of the cookies begin to turn golden brown. They will look a bit underdone in the middle, but will continue to cook once out of the oven. Cool the cookies on the sheets at least 2 minutes. Sprinkle with a little sea salt. Remove the cooled cookies from the baking sheets after a few minutes and transfer to a wire rack to cool completely. Repeat with remaining dough.

Recipe – ambitious kitchen.com

Mom’s birthday cakes (chocolate rum and banana walnut)

IMG_9714

This year, we sisters decided to throw a surprise birthday party for Mom. Its her birthday tomorrow and we are having a surprise party at her place tonight. All the secret arrangements have been made and we have arranged for mom to go on a coffee date while her minions set up everything at home. Everyone has been warned to hide in the corners till she exits the building before coming home, Super exciting.

IMG_9715

A while ago, before this surprise party was planned, had asked Mom what kind of cake she wanted. She said Banana Walnut and I was perplexed. How can u make a tea cake look like a birthday cake. And then this party was planned, so I knew now I needed 2 cakes.

Untitled1

One that was chocolatey, rich, sinful and the other a simple cake as per moms request. Made the chocolate cake that I had made for my birthday before though this time infused it heavily with rum and layered with Nutella. Sprinkled some crushed toasted hazelnuts on top.

Untitled

The second cake is a delightful naked banana walnut cake layered with some whipped cream. Hope I met mom’s expectations. Both these recipes are from Nidhi S Raj’s blog. (www.soulandspicebox.com)


CHOCOLATE RUM CAKE

For the basic Chocolate Sponge Cake:

4 eggs

1 1/4 cup sugar

1 cup all purpose flour

3/4 cup butter

1/2 cup cocoa powder

1 tsp vanilla essence

2 tsp baking powder

Nutella jar

For the chocolate Ganache:

Dark Chocolate 2 cups (chopped)

Heavy Cream 1 cup

Butter 2 tbsp

Rum Syrup:

2 tsp powdered sugar,

1/2 cup water

1/3 cup dark rum

For Garnishing:

Roasted Hazelnuts

  1. Grease and dust 8″ cake pan. Pre heat the oven to 300F.
  2. Sieve the flour, baking powder and cocoa together.
  3. Beat the butter and sugar very well until thick and well combined.
  4. Add eggs gradually, and keep beating the mixture till it is mixed well and is fluffy. Gradually add in the dry ingredients and fold inslowly. Do not overbeat the mixture.
  5. Pour the mixture into the prepared tin.
  6. Bake in a hot oven at 180 for 30 minutes or till a toothpick comes out clean.
  7. Once the cake is baked, put it on a wire stand and let it cool.
  8. Divide the cake into 2 parts horizontally.
  9. Make a syrup by mixing 1/2 teacup of water with 2 teaspoons of powdered sugar.
  10. Using a silicon brush, sprinkle a little syrup over the two cake parts and allow them to soak. Repeat after 10 minutes.
  11. To make the chocolate ganache, roughly chop the dark chocolate and set aside.
  12. In a pan, add the heavy cream and put it to boil. Once the cream starts boiling, remove from heat and add to the dark chocolate. Add in the butter.
  13.  Gently spread the hot cream over the chocolate pieces so that everything is evenly covered. Let this sit for 5-7 minutes.
  14.  After 5-7 minutes, take a whisk and whip the contents till you get a smooth creamy mixture. Make sure no lumps of chocolate remain in the ganache.
  15. Cool the ganache in the refrigerator for 20-30 minutes before use.
  16. To assemble the cake, take a serving platter and put one piece of cake on it. Coat it generously with the Nutella.
  17. Place the top part of the cake and apply a generous coat of ganache icing, covering each side of the cake.
  18. Roughly chop 10-12 roasted hazelnuts and sprinkle them on on the cake.
  19. Keep the cake in a refrigerator for 2 hours before serving.


BANANA WALNUT CAKE


All purpose flour – 1 1/2 cups

Baking powder – 2 tsp

Cinnamon –1 tsp

Oil – ¾ cup

Bananas -2 ripe (mashed)

Walnuts -1/4 cup (chopped)

Brown Sugar – 1 cup

Eggs – 2

Vanilla extract – 2 tbsp

Salt – 1 pinch


  1. Pre heat the oven to 180 C and place a baking tray in the center rack of the oven.
  2. Sift the flour, baking powder, cinnamon and salt.
  3. In a large bowl, whip the eggs and brown sugar till you get a smooth batter.
  4. Gradually add the oil and keep beating the batter with your hand blender.
  5. Add the mashed bananas and extract to the batter. Whip the batter for 1 minute.
  6. Gradually add the dry ingredients and fold it in. Don’t over beat the batter.
  7. Add the chopped walnuts and mix it well to ensure they are well coated.
  8. Pour the batter into the  cake tin and bake in a pre heated oven at 180 C for 30 minutes or till a toothpick comes out clean.
  9. You can choose to layer the cake and filled whipped cream