DDL Brownies

IMG_3747

A while ago there was this DDL craze on CaL. Not to be mistaken with DDLJ  but equally delicious

The first time I made DDL (Dulche De Leche – caramalised condensed milk), I was petrified. Umpteen discussions with CaL members and step by step procedure approvals before finally attempting it. And then it was love at first lick.

Made a few desserts with DDL and then seemed to have pushed it to the back of my mind.

IMG_3749 1

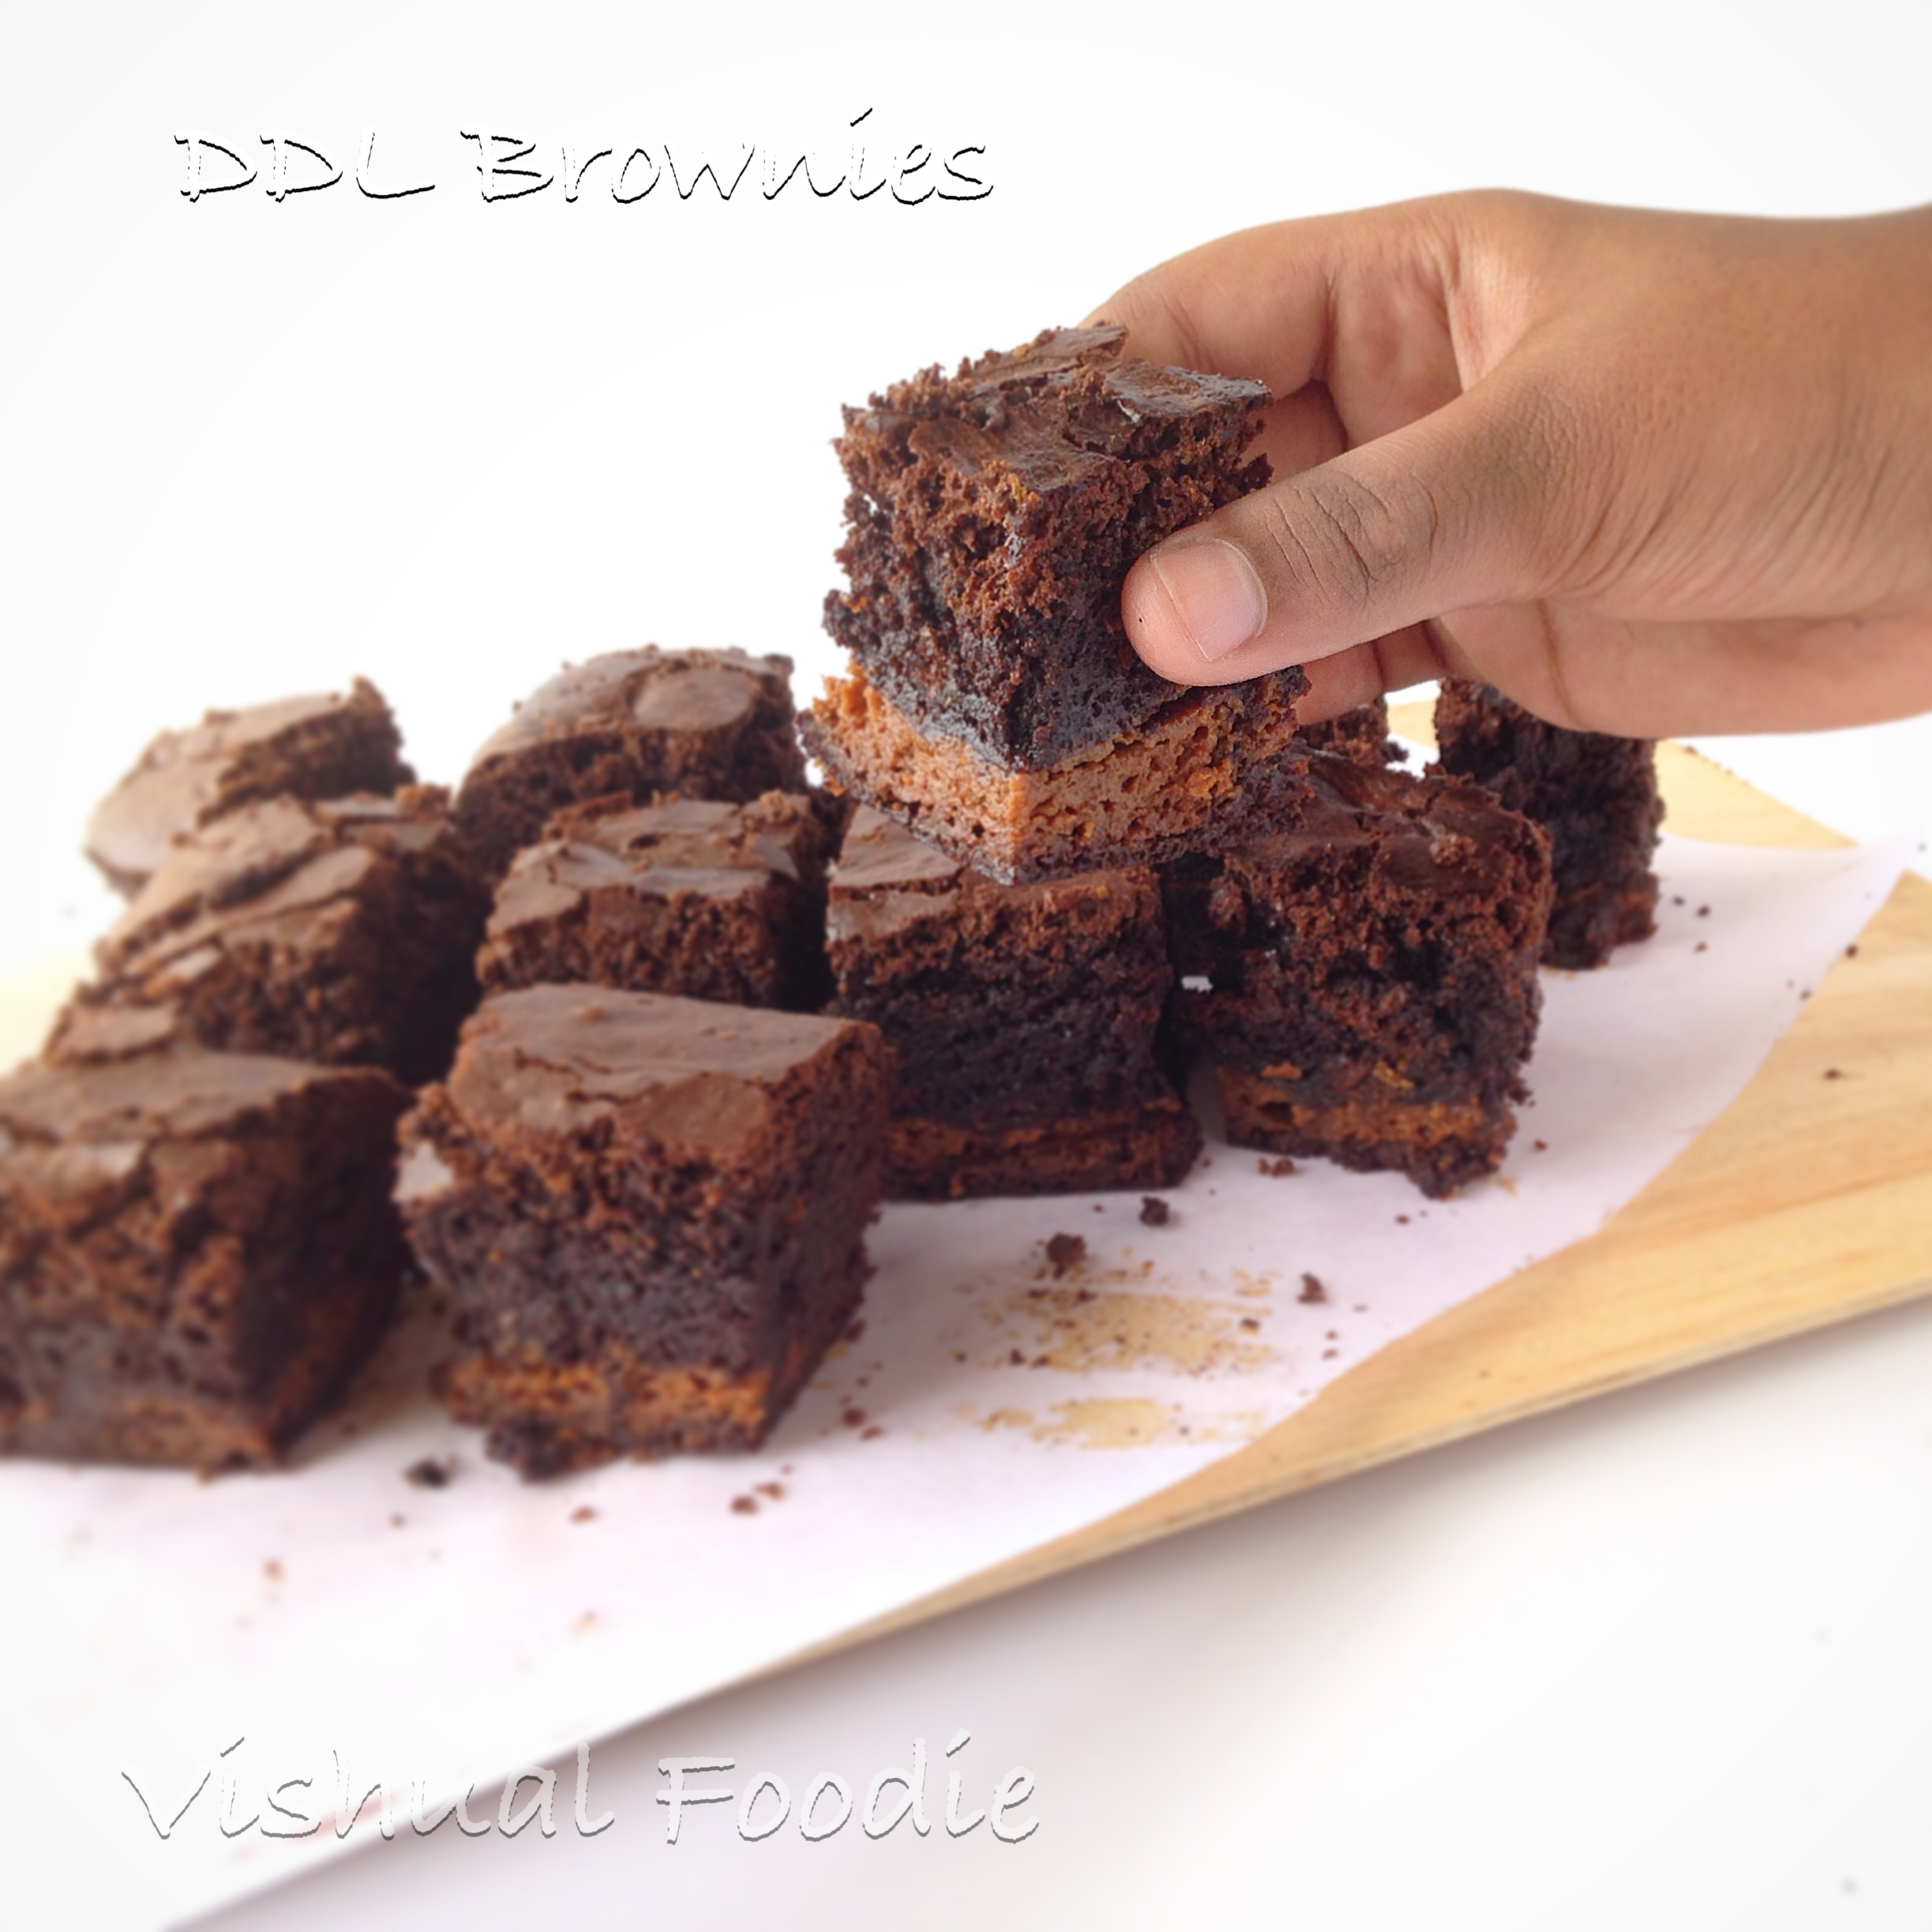
Today I wanted to make something for my building friends and kept wondering what new should I do with brownies. It suddenly hit me DDL and that was it.

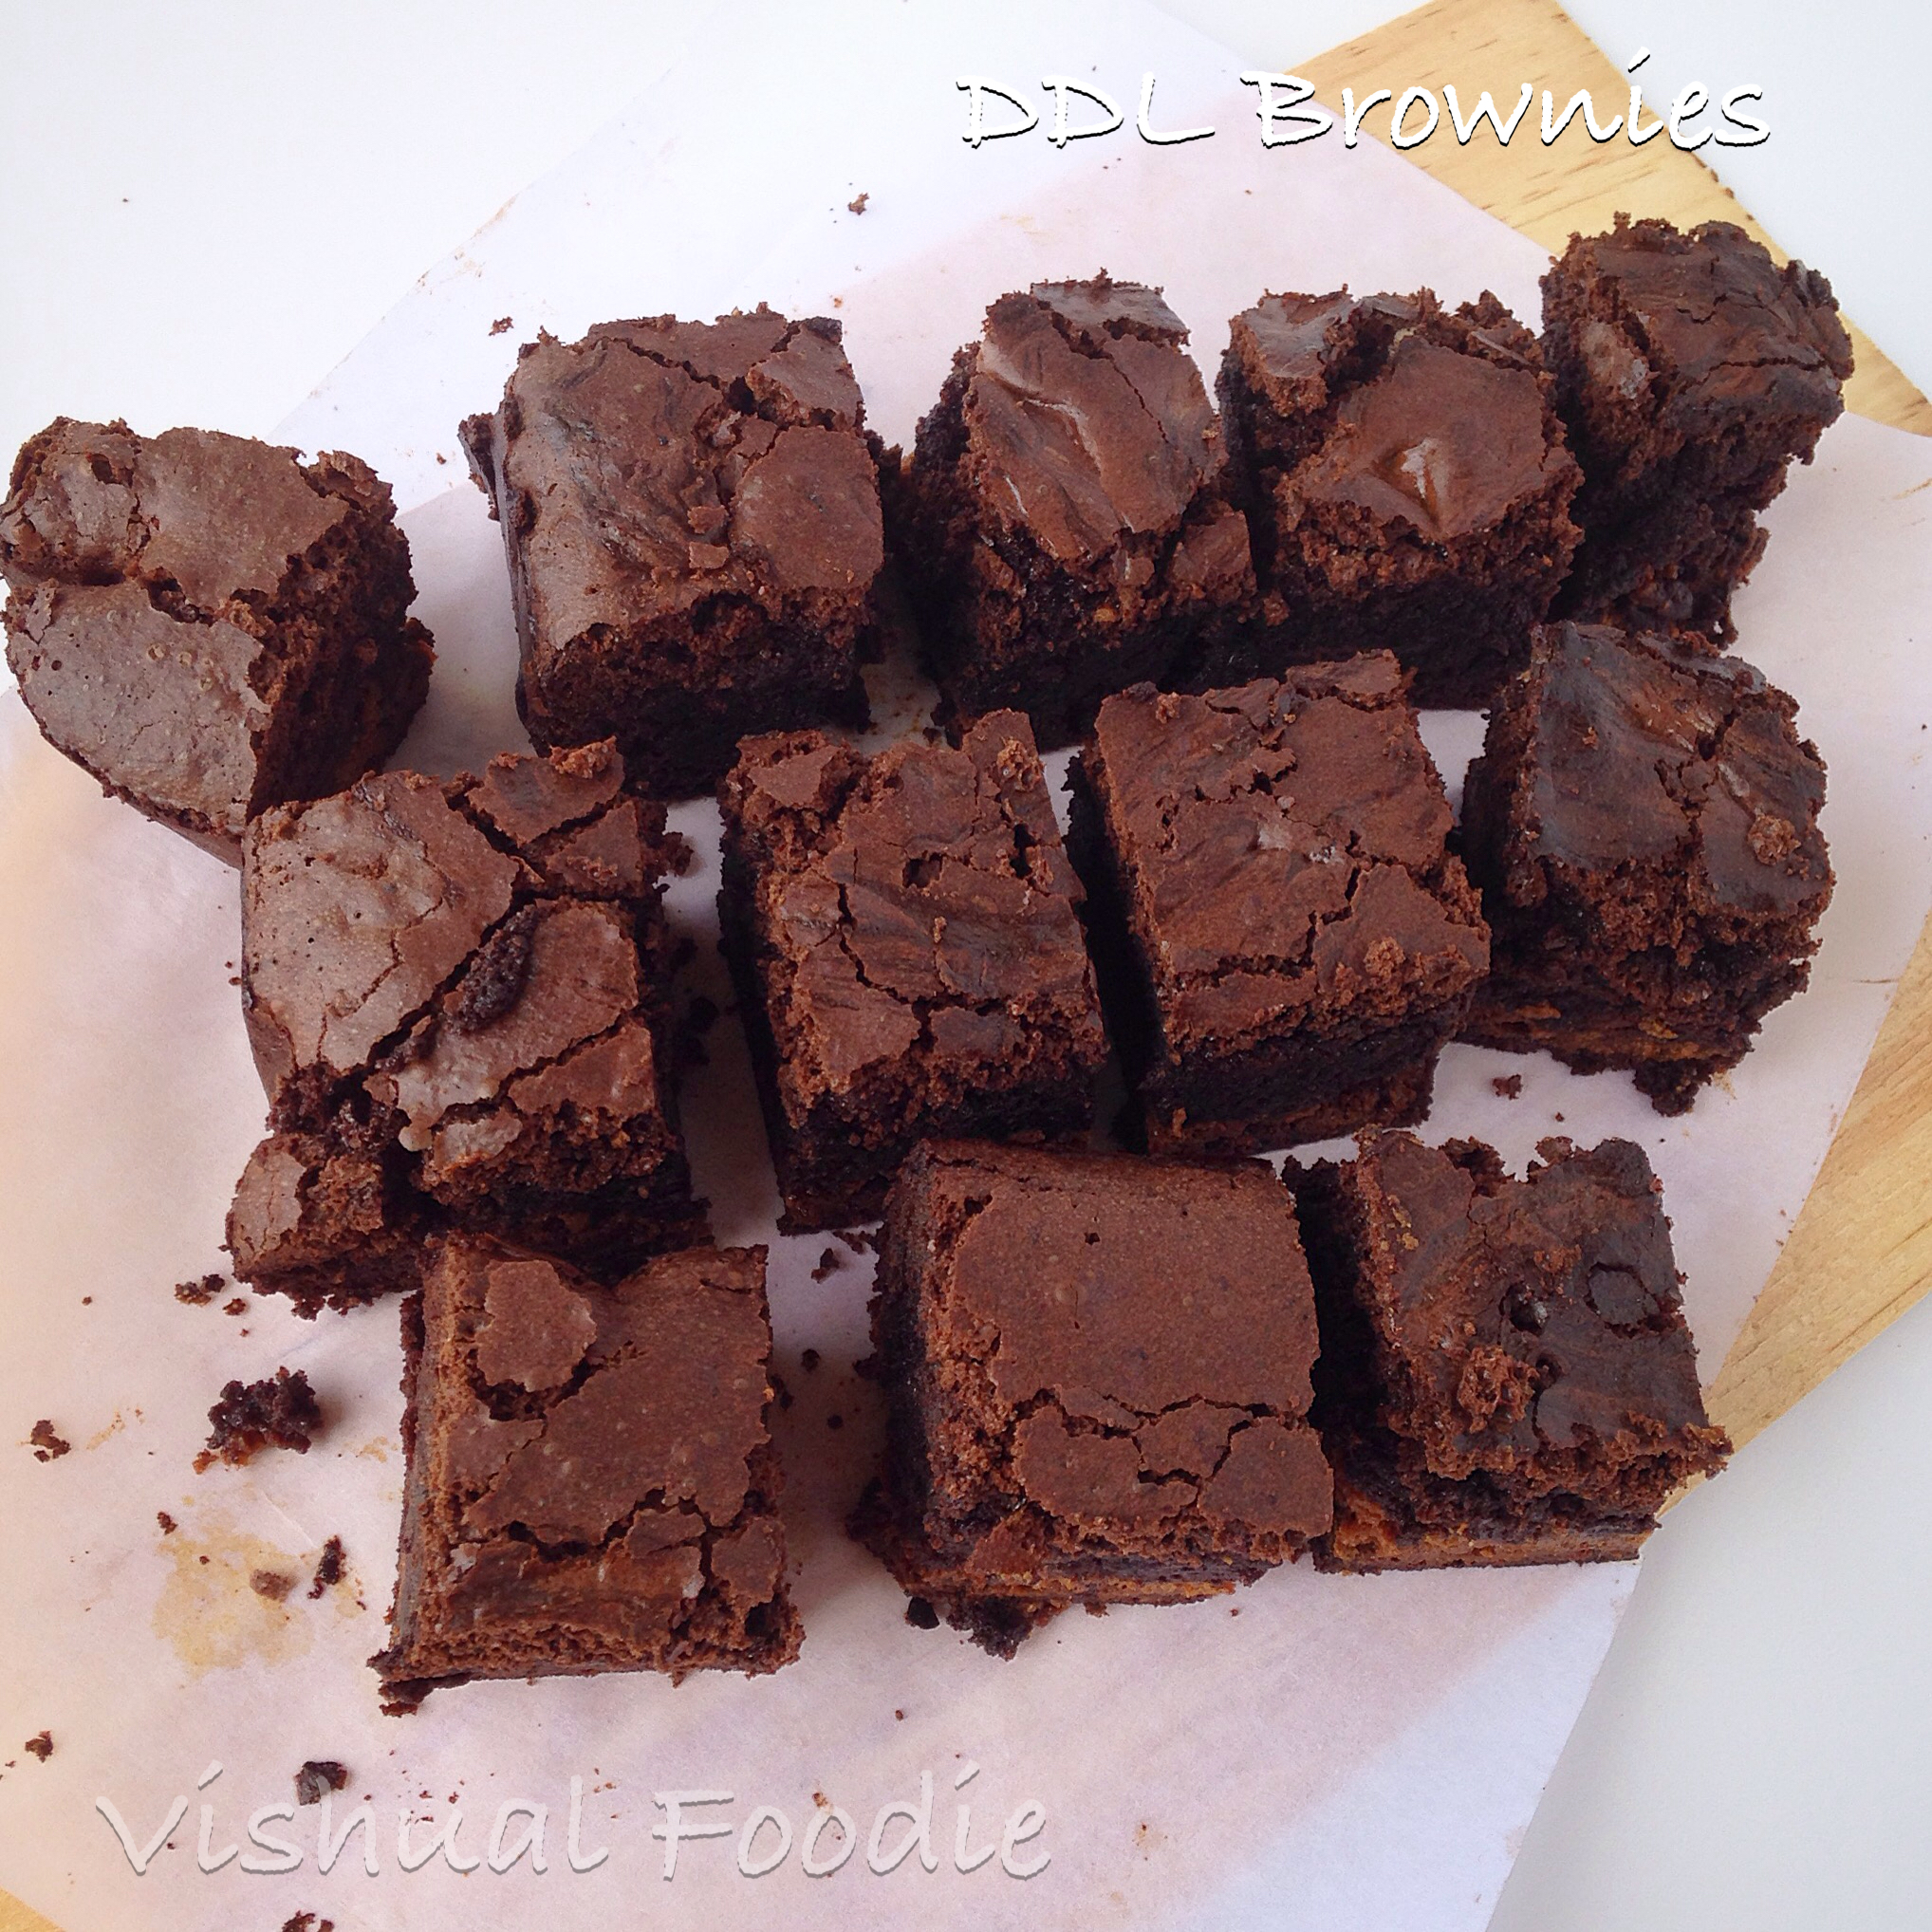
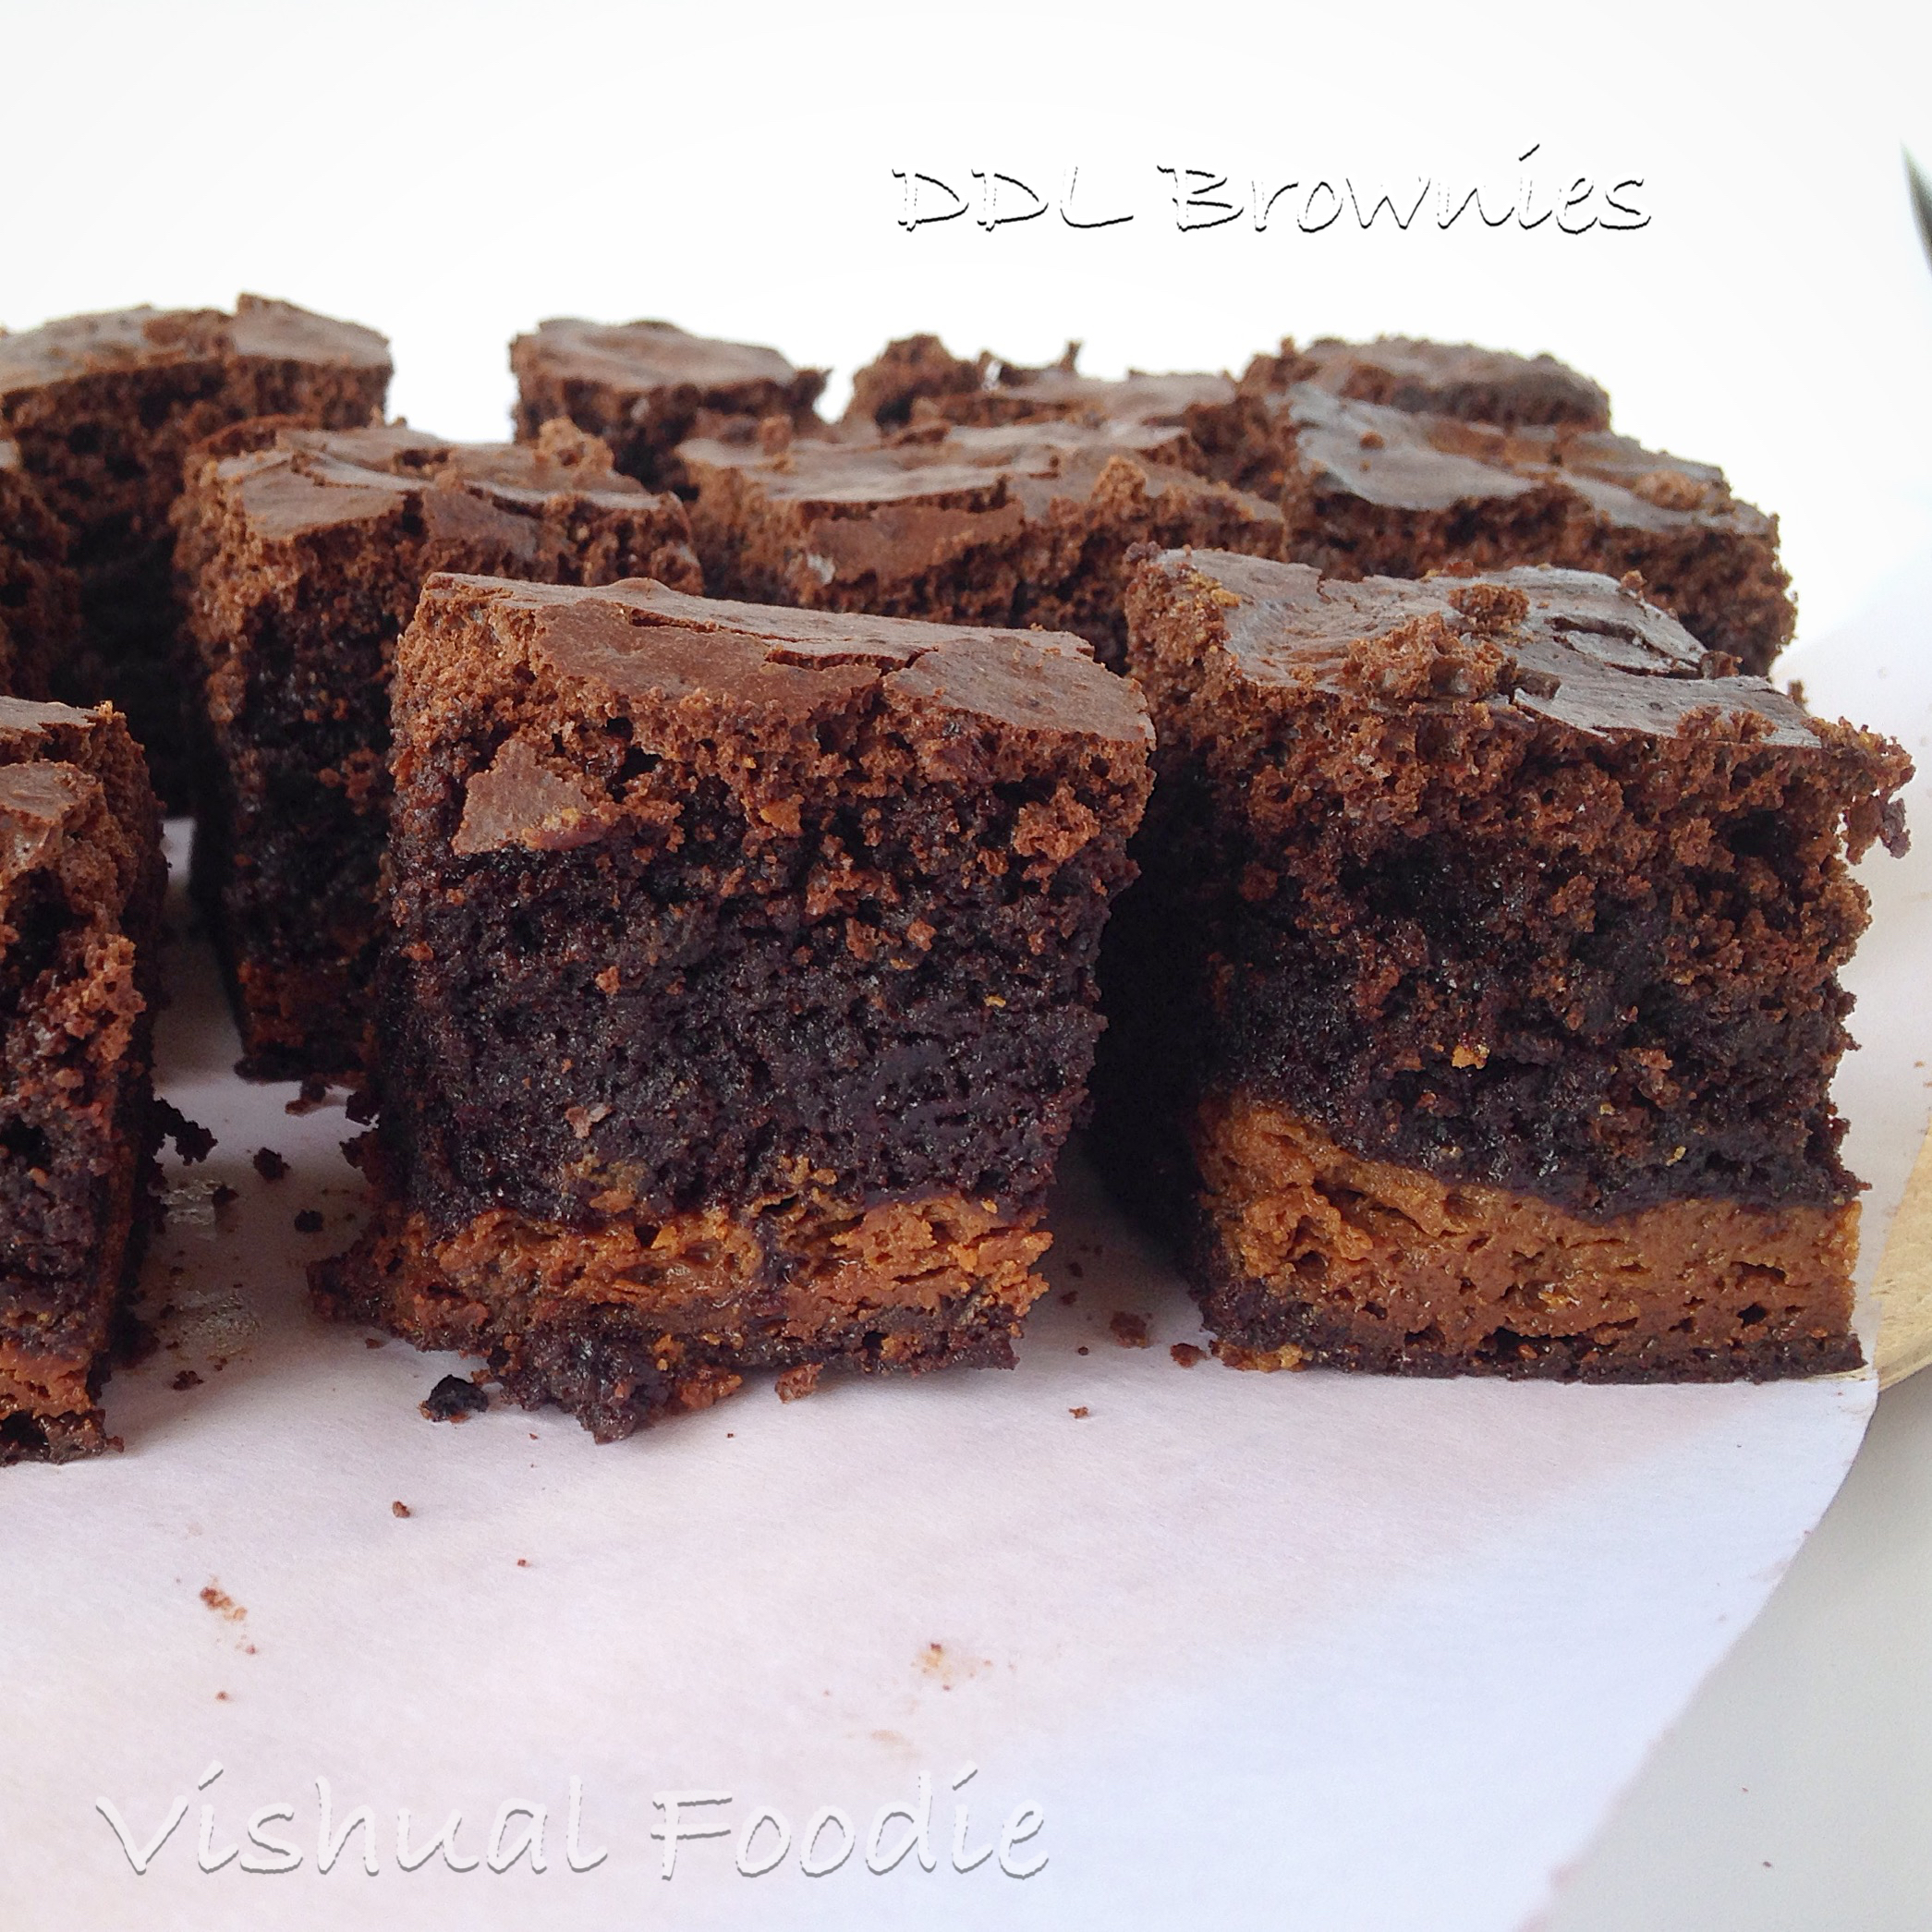
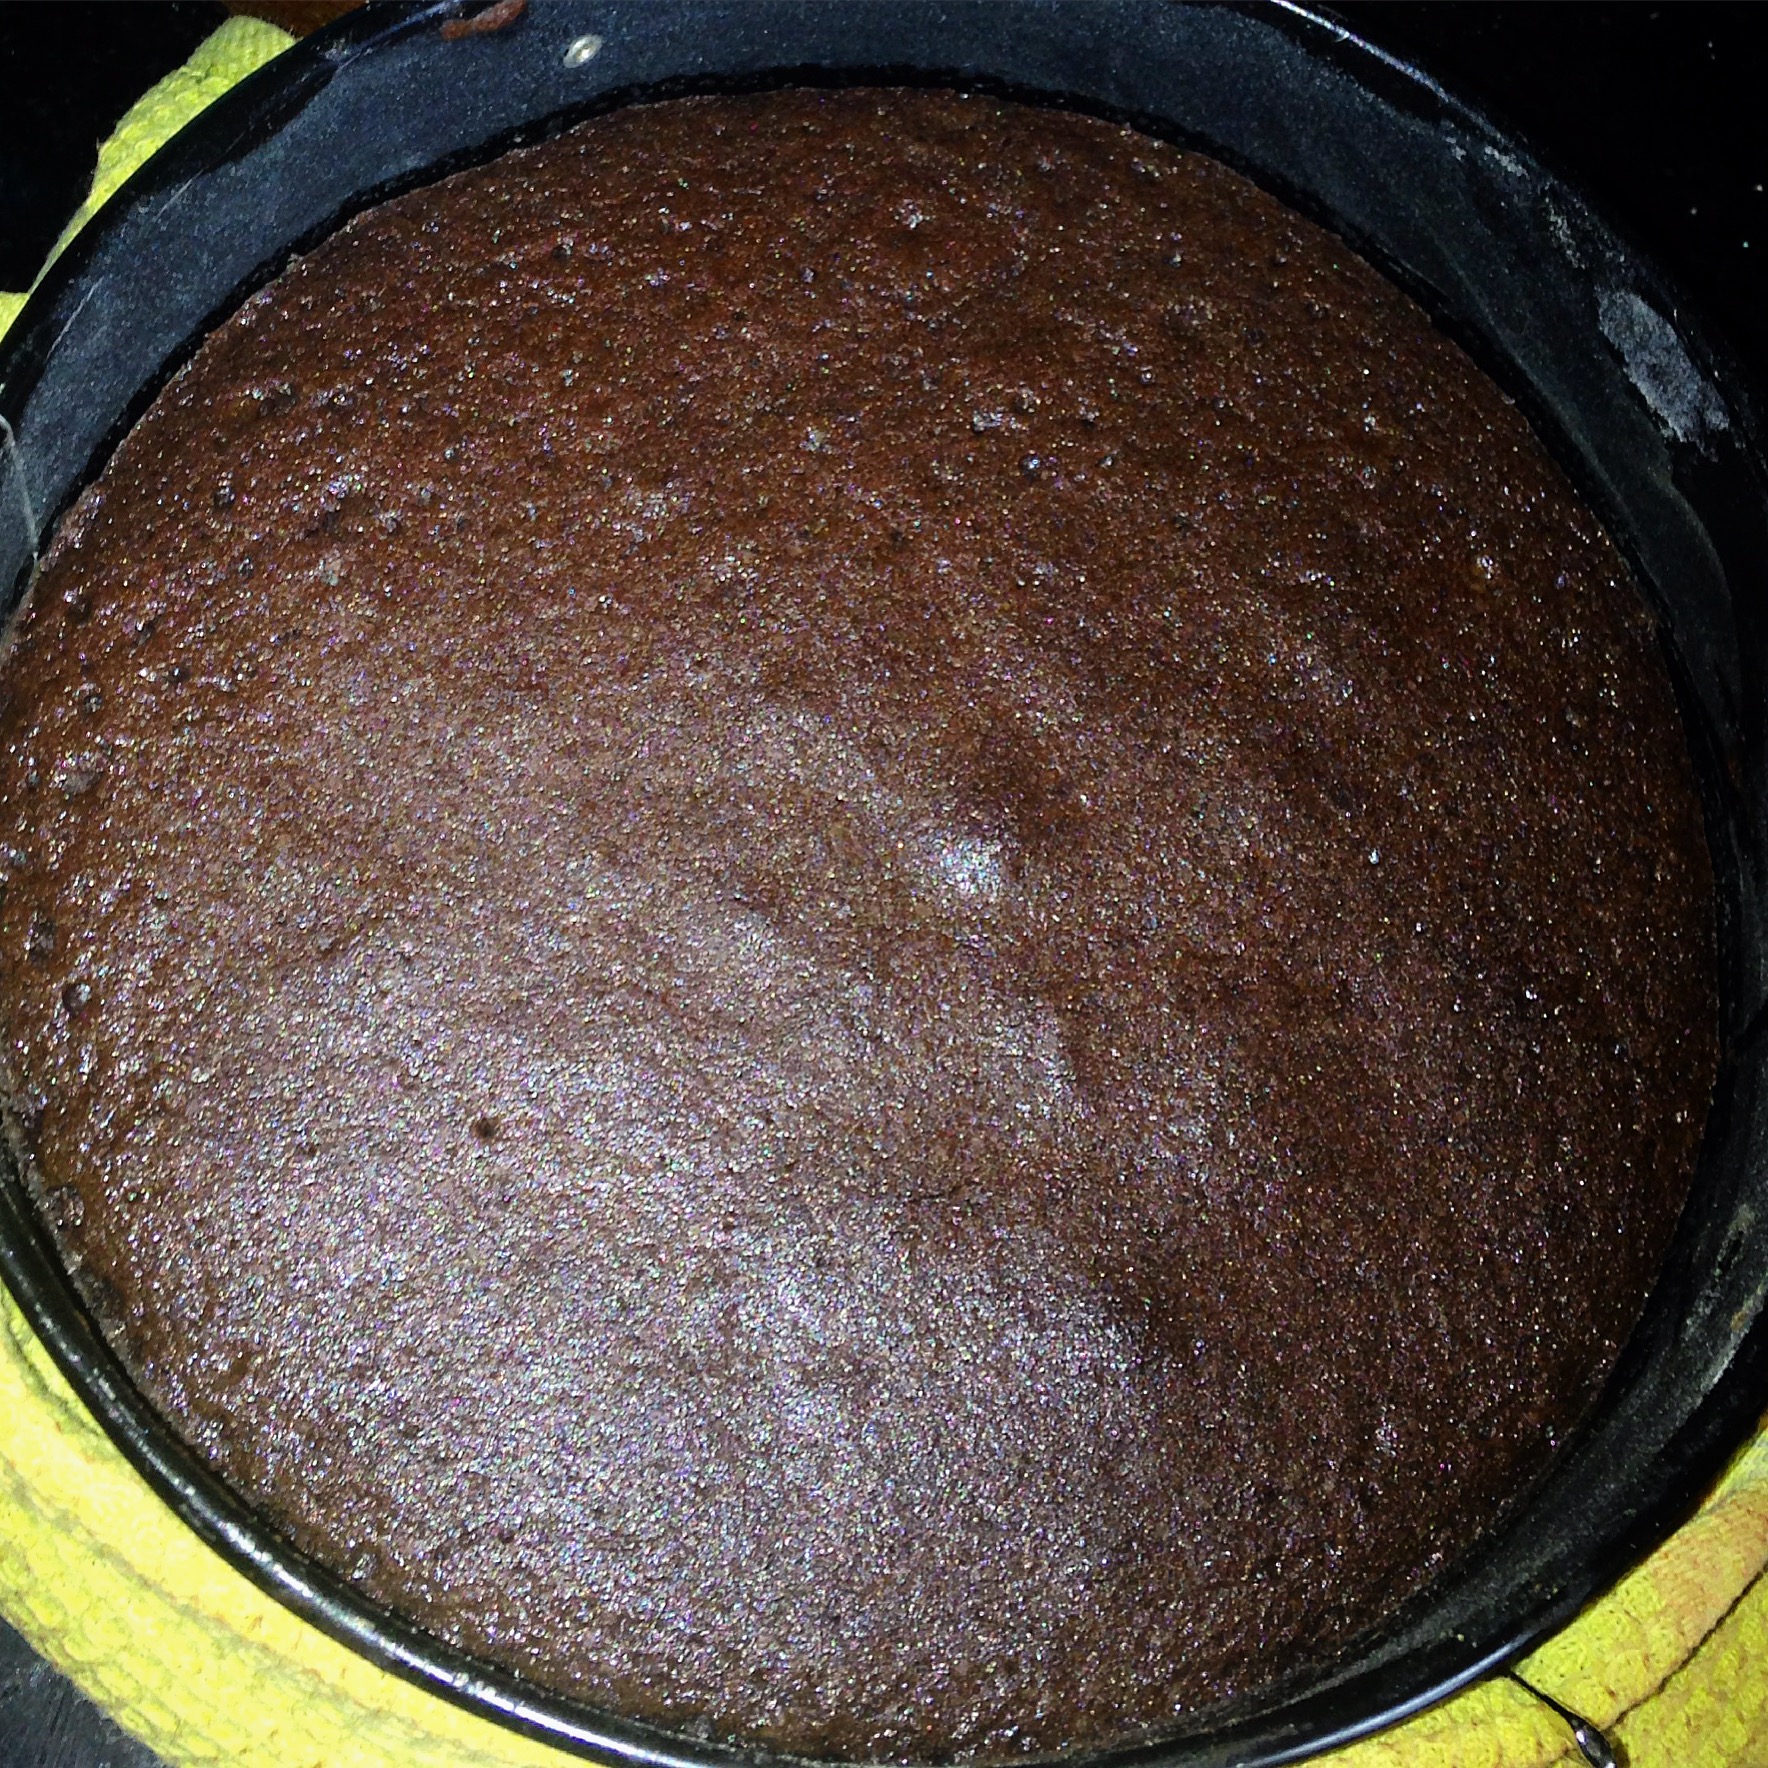
Delicious DDL brownies ready. The caramelly chewy bottoms make this brownie extra special.

IMG_3750 1

DDL –

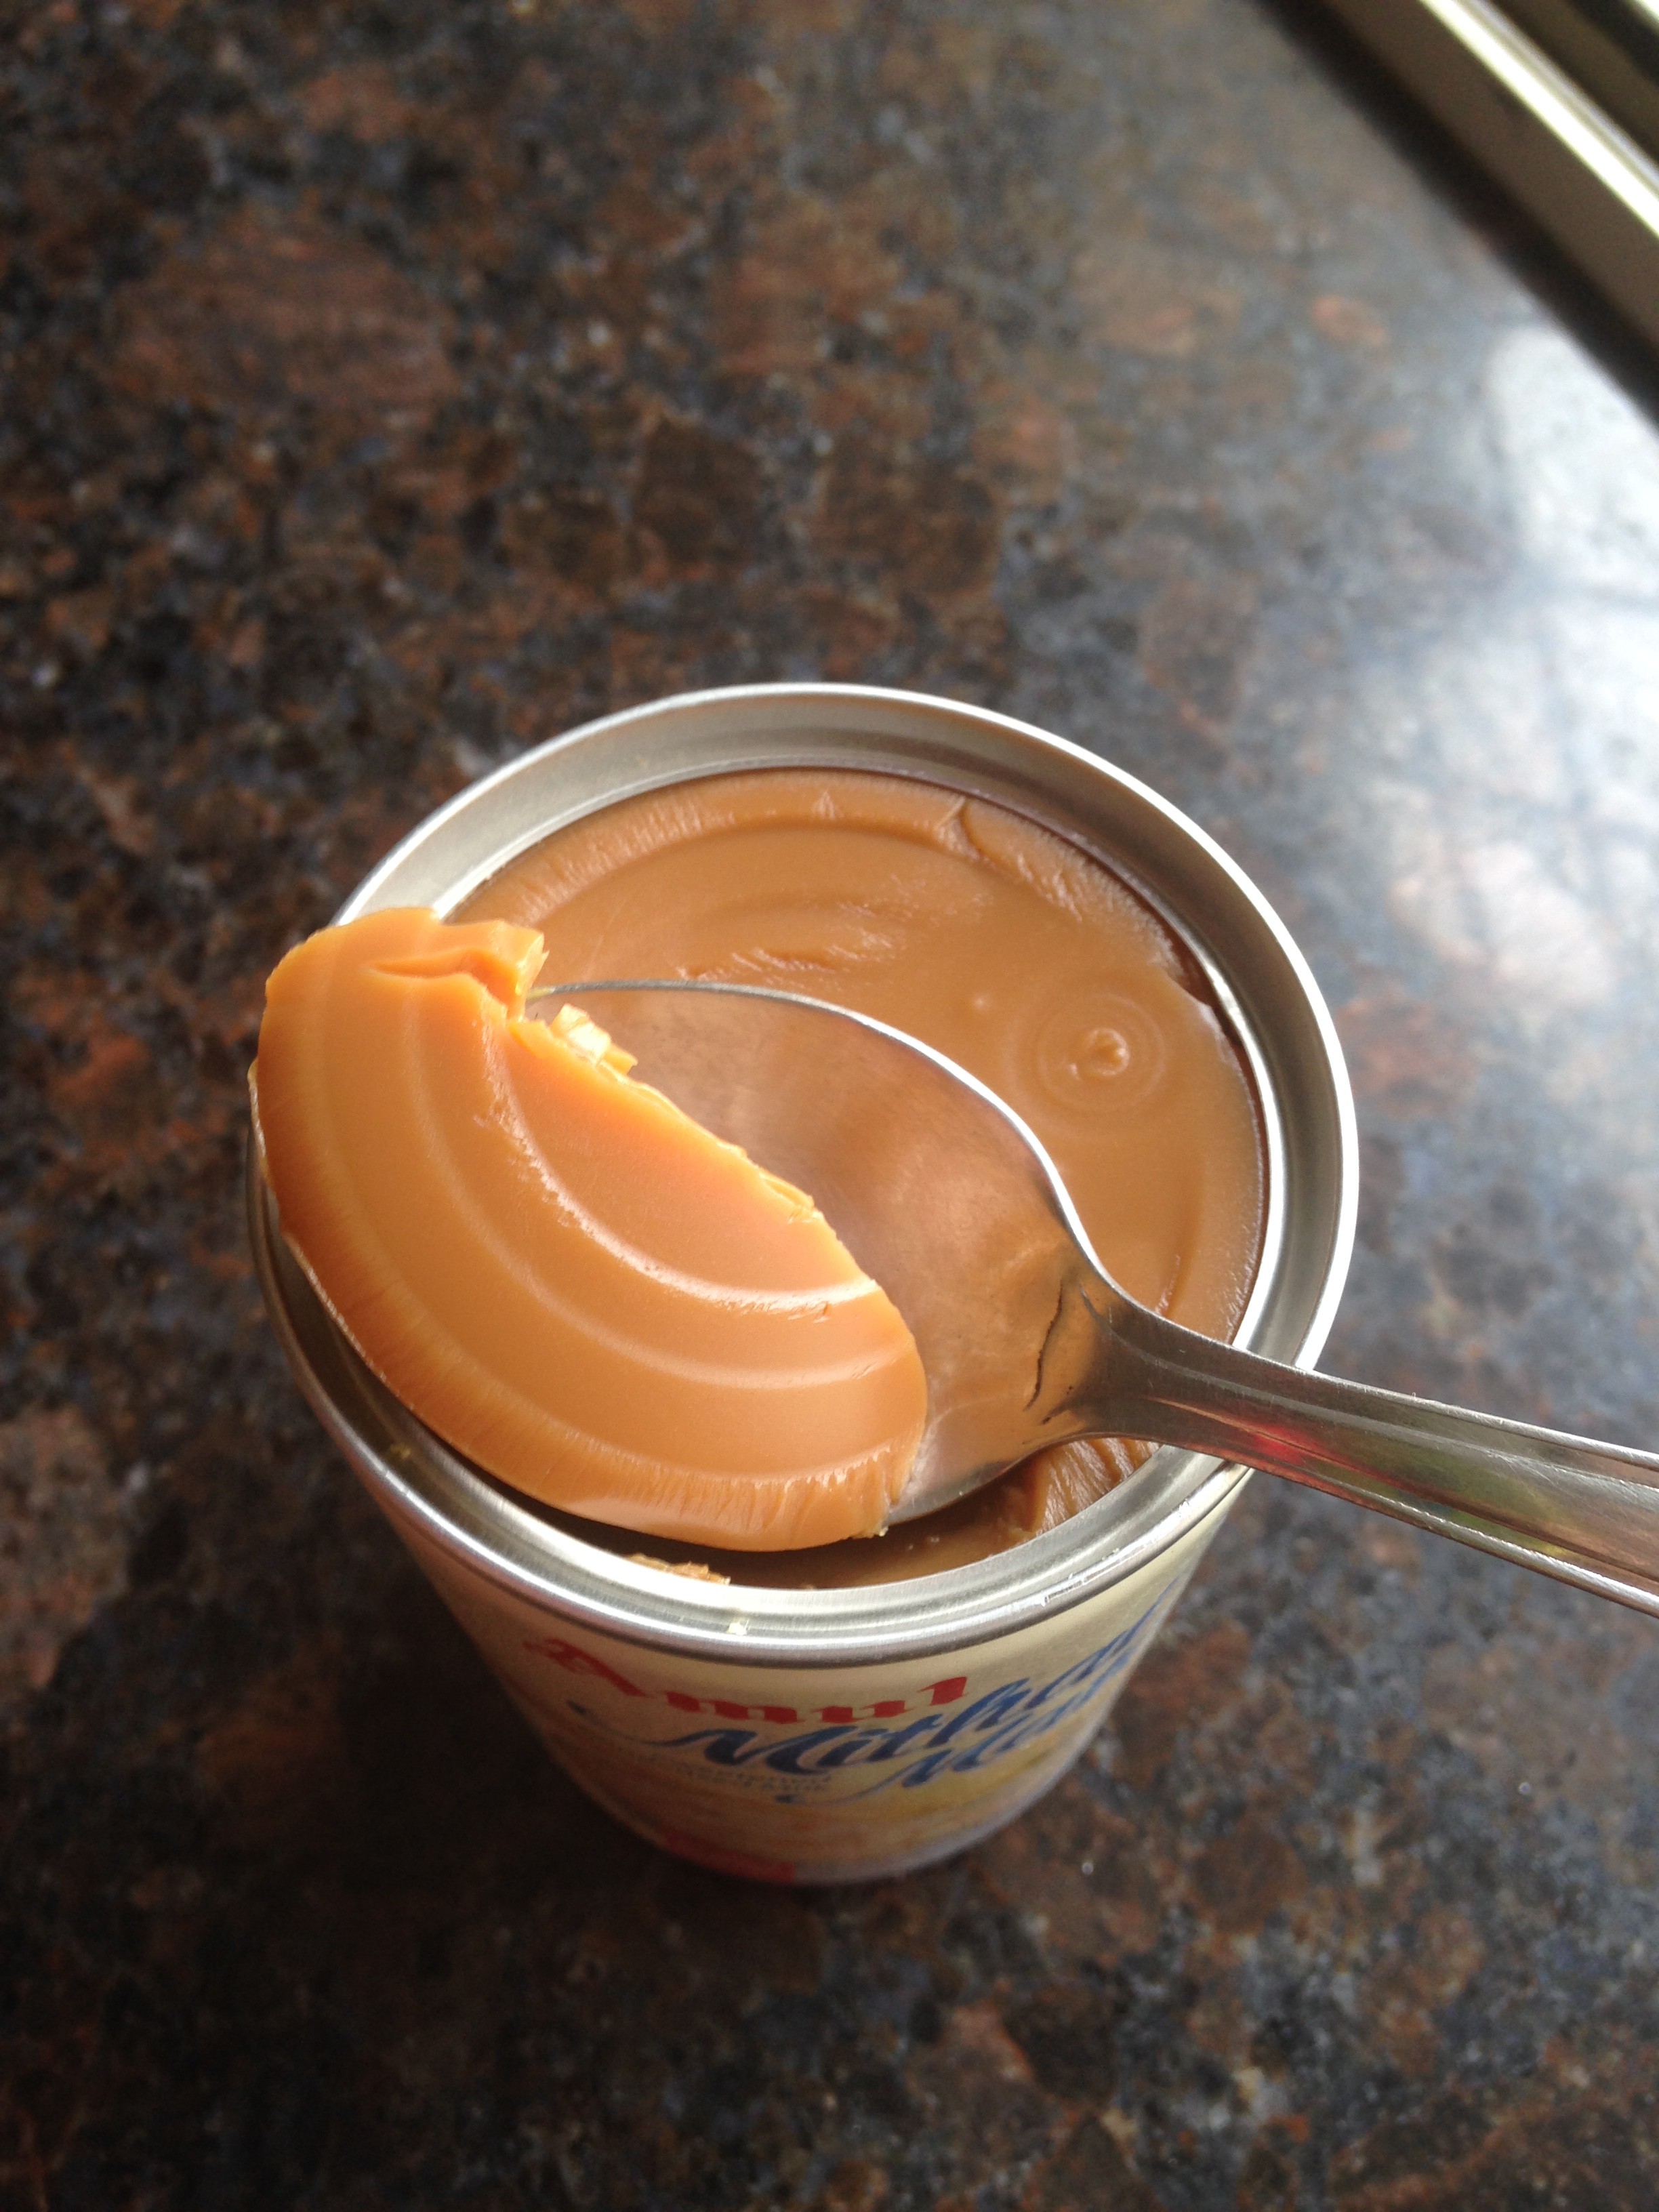
  1. Take a can of Amul/Nestle condensed milk. Discard any plastic lid. DO NOT open the can, it has to be sealed.
  2. Take a big pressure cooker and fill it with water
  3. Insert the can and keep it lying down side ways in the cooker. The water level should be higher than the can.
  4. Put the cooker lid with the whistle on and keep on high.
  5. After the first whistle, keep on slow for 20-25 mins.
  6. Shut the gas and DO NOT touch the cooker for another hour or till its absolutely cool to touch.
  7. Open the lid and remove the can carefully, leave aside till absolutely cool.
  8. When cool, open and use.

IMG_3690

Brownie Ingredients:

Morde Dark Chocolate – 220 gm
Amul Butter- 110 gm
Eggs- 3
Brown Sugar- 190 gm
Flour- 80 gm
Cocoa powder- 10 gm
Vanilla extract- 1 tsp
Coffee powder – 1 tbsp


  1. Melt the butter and chocolate together. Cool.
  2. Add the sugar to the chocolate mix and whisk. Add the eggs, one by one, whisking between each addition.
  3. Add the vanilla and give another quick whisk.
  4. Sieve the flour, cocoa powder and coffee powder.
  5. Add the dry ingredients in two increments. Use the cut and fold method. Do not over-mix.
  6. Use a double boiler to get the DDL to a thinner consistency.
  7. Preheat the oven at 180C.
  8. Line an oven-proof dish with butter paper, leaving a little bit of overhang on all sides, just enough to be able to pull the baked layer from the dish. Pour the DDL and spread evenly.
  9. Pour the brownie batter and smoothen the top with a spatula.
  10. Bake in a pre-heated oven at 180 C for 35-40 minutes.
  11. The tops should be firm and a toothpick inserted in the centre should come away with just a little stickiness.
  12. Leave it in the oven for a few more minutes. Cool.

Eggless Tiramisu

IMG_3574

Once upon a time there was this super lazy lost girl. Yeah she did cook occasionally but nothing to talk about back home.

One day she entered a door that took her into the world of Facebook food groups and she met some amazing friends who encouraged and guided her to try things she could only dream of. It set her on a path to wonderland where she encountered food never heard of or concoctions she could only dream off. She got recognised on websites and magazines and her confidence grew.

IMG_3572

Then some friends started pushing her to start a blog. And she was like oh god so much work, I can’t do it. Well her major handicap was that she was super lazy. But she had a secret weapon, her amazing friends and mentors who never gave up

Finally the blog started and in one month there were 50 posts, OMG. But then the laziness virus attacked and the next 50 took six months to complete.

IMG_3571

Now here I am, the lost little girl who is super happy to celebrate her 100th blog post.

Anyone who knows me also knows that Tiramisu is my ultimate most favourite dessert and am glad I got to celebrate this occasion with it. Better still I got to try one of my very first foodie friends recipe. Thank you Suchit Save www.delectableinc.wordpress.com for this amazing recipe that’s eggless too.

IMG_3573

Ingredients

1 cup Mascarpone Cheese

1/4 cup castor sugar

1 cup whipped cream (soft peaks)

1 tsp gelatin

2 tbsp water

2-3 tbsp Kahlua/Baileys Irish Cream, Tia Maria or any Coffee Liqueur OR 2 tsp instant coffee mixed with a little warm water just to dissolve it. (I used Baileys)

1 cup chocolate cake crumb (u can use store bought chocolate slice cake too)

Cocoa Powder for dusting

1/2 cup black coffee (1 tbsp instant coffee mixed with 120 ml water)

5-6 Individual serving cups or 1 large bowl


  1. Beat whipping cream to soft peaks and keep aside.
  2. In a mixing bowl, add the mascarpone, sugar, the coffee liqueur/coffee mixed with a little warm water and mix until incorporated.
  3. Add the gelatin to 2 tbsp water and let stand for a couple of minutes before gently heating the same to melt the gelatin.
  4. Once it cools, fold the gelatin and the whipped cream with the mascarpone mixture and mix very gently to avoid collapsing the air from the whipped cream. Refrigerate until you prep the base.
  5. Now get your serving cups out or if you’re making one large serving and then slicing it up, one large bowl.
  6. Arrange half of the cake crumbs (distribute evenly among the serving cups) at the bottom of the cups/bowl and press very lightly to even the surface.
  7. Slowly dab the base with the black coffee mixture (use a pastry brush or pour gently with a spoon).
  8. Spoon half the mascarpone mixture onto the prepared base and spread evenly.
  9. Repeat with another layer of cake crumbs, black coffee and mascarpone mixture.
  10. It’s advisable to refrigerate the same for at least a couple of hours before serving. Cover it with cling wrap and refrigerate until needed.
  11. Just before serving, discard the cling wrap and dust the top with cocoa powder.

Dum Ghosht Biryani

IMG_3166 1

A year ago I joined this group called Chef At Large that has had a huge impact in my life.

IMG_3167 1

I slowly developed an interest in cooking, a curiosity in experimenting, a passion for food and a new found talent in food photography. I blossomed under the praise, appreciation and encouragement showered on me and even went into business with home catering.

IMG_3168

I overcame my fear of baking thanks to friends I met here. I have tried some dishes that I wouldn’t have never imagined attempting before. I started my blog too because of friends who nagged and encouraged and helped me to do it.

IMG_3169

I made such amazing friends here who not only encourage me but stand next to me whenever I have needed them.

IMG_3170

I know this is a senti post but I am grateful to this platform for the positive changes it has brought in my life. Happy anniversary to me and Eid wishes to everyone celebrating this wonderful festival.


Ingredients

3/4 kg mutton

2 finely sliced onions

2 tsp ginger garlic paste

1 ½ tsp salt

¾ tsp red chilli powder

juice of 1 lemon

1 cup dahi

Whole spices for mutton (coarsely powdered – 6 choti illaich, 6 laung,

1 tsp ajwain, 1/2” dalchini, ½ saboot kali mirch)

5 tbsp oil

1 tbsp melted ghee

¼ cup chopped coriander

¼ cup chopped pudina

2 chopped green chillies

¼ tsp kesar soaked 15 mins in 2 tbsp milk

2 cups basmati rice

1 tbsp ghee

6 choti illaichi

8 laung,

2 tej patta

1” dalchini


  1. Wash mutton and pat dry.
  2. Heat oil for deep-frying and fry onions till brown. Cool and grind in a grinder. Keep brown onion paste aside
  3. Marinate mutton with ginger-garlic paste, red chilli, salt, lemon juice, brown onion paste, dahi, coarsely powdered whole spices. Mix well. Marinate overnight
  4. In a pressure cooker heat 5 tbsp oil, add the marinated mutton with the marinade. Bhuno the mutton for 5-7 mins till brown and dry. Add little water and pressure cook for 7 mins on high and then 5 mins on low flame. Remove from fire and when the pressure drops, check if the meat is tender. Cook more accordingly else dry on fire to get a thick masala.
  5. Wash rice and soak for 30 mins. Boil 8 cups water with 1 tbsp ghee, choti illaichi, laung, tej patta, dalchini and 3 tsp salt
  6. Add rice. Cook till rice 90% done. Drain & spread rice on a tray
  7. Take a heavy bottomed pan, grease bottom with 1 tbsp ghee
  8. Put a layer of boiled rice, sprinkle dhania, pudina, chillies. Add ½ mutton, then add another layer of rice, top with dhania, pudina and chillies add then add remaining mutton.
  9. Top with rice layer. Sprinkle the remaing dhania, pudina and chillies. Sprinkle soaked kesar and 1 tbsp melted ghee.
  10. Cover tightly and cook over slow fire. (I put the handi/pan on a tawa and kept a heavy vessel on the lid to seal it or you can seal it with chapati dough). Cook for 10-15 mins on dum or till the rice is cooked and shut the gas. Do not open for another 15 mins as it will cook in the steam.


Eggless Lemon cake with a lemon Glaze

IMG_2703 1

I am in love with baking. If I am sleepless I bake, if I want to gift someone something I bake, if want to celebrate I bake.

IMG_2701

I may not be a professional baker or someone who can figure out the recipes by herself. I research recipes and save those I feel will work. I usually make egg cakes but I have this cutie foodie friend and CaL member Apeksha who every time I bake will ask – Eggless hai kya. And keep on yelling ‘Eggless kab banayegi?’ So this post is dedicated to her.

IMG_2705

An EGGLESS lemon cake with a lemon glaze. It’s a recipe taken from sugarnspicebyradhika. I tasted the cake when it was done and felt the sweetness was not enough but after adding the lemon glaze it was such a wonderful balance. Moist and delicious. A must try for all.

IMG_2702 1

Ingredients

130 gms APF

120 ml buttermilk

70 gms butter

80 gms castor sugar

1 tsp vanilla essence

1 lemon zest

1 tbsp juice

1 tsp baking powder

1/2 tsp baking soda

50 ml milk

For the lemon glaze:

4 tbsp icing sugar

1-2 tsp lemon juice

For the buttermilk:

125 ml milk

1 tbsp lemon juice


  1. To make the buttermilk, heat the milk and when it boils, add the lemon juice. Shut the gas when the milk curdles. Strain it and leave it to cool.
  2. Preheat oven to 180 C.
  3. Whisk butter until light and fluffy.
  4. Add in the sugar and whisk again.
  5. Add in the vanilla essence, lemon juice, lemon zest and mix.
  6. In a separate bowl, sift flour and baking powder.
  7. Add the flour mix to the butter mix little by little, keep alternating with buttermilk. When you run out of buttermilk start adding milk to the flour mix. Fold it in gently.
  8. You should have a smooth batter by now, pour this batter into a greased baking tin with butter paper on bottom.
  9. Bake at 180 degree Celsius for about 25 minutes or until a skewer inserted in the centre of the cake comes out clean.

For the Lemon Glaze:

  1. In a bowl add the lemon juice to icing sugar and mix. You’re looking for a slightly thick pasty consistency. It shouldn’t be too runny. If its runny add more icing sugar, if its thick add more lemon juice.
  2. When the cake cools down, cover it with glaze and a few lemon slices on top (only for looks).

Recipe courtesy www.sugarnspicebyradhika.com

Black bean stir fry noodles

IMG_6425

FAMILY

Is it only restricted to blood and marriage or does it also define a relationship that encircles strangers who come together as Friends to share and learn and help and appreciate.

I consider the Chef At Large group as family where u see familiar faces popping in to say hi or new ones who inspire u to try something or the stars who just stun u with their creativity. Let’s share a family style meal of Rice noodles with chicken and vegetables in a black bean sauce.


IMG_6424

Ingredients

1/2 pkt Rice noodles
1/4 kg boneless chicken
1 small head of broccoli broken into florets

5 babycorn cut to 1″ pc
1 pkt quartered button mushrooms
10-12 minced garlic flakes
2-3 slices spring onions 
1-2 tsp soya sauce
3-4 tbsp black bean sauce
2 tbsp oyster sauce
1 tsp fish sauce
1-2 tbsp red chilli sauce
1 tbsp cornflour mixed with water


  1. Cook the noodles as per packet instruction. (I soaked them in hot water for about 20 mins). Check when Al dente and remove from water. Remember it will cook more in the sauces so don’t let it get too soft initially. 
  2. Heat oil in a wok, fry the garlic and when it sizzles add the chicken and little salt. Cook till 70% done, add the babycorn. Cook for another 5 mins. Add the mushroom and spring onion whites. Stir on high heat. When mushrooms are nearly cooked add the broccoli and cook for 2 mins. (Remember all the meat and veggies have to be added one after another depending on their cooking time-this will ensure a crunch to the veggies)
  3. Add the sauces and mix well. Add the cornflour paste and adjust seasoning now. (Don’t add salt before as the sauces have salt so taste and adjust at the end)
  4. Add the noodles and mix well. Cook till noodles are at the preferred texture
  5. Garnish with chopped spring onion greens and crispy garlic.

Pesto and Spiced Cheese Pull Apart Loaf


Phobias are meant to be conquered. I have a phobia of crowds – Enochlophobia. Can’t go to a busy public place as I start to have palpitations when it’s too crowded. Am trying to overcome it but looks like I am fighting a losing battle

IMG_2471

Another phobia is working with yeast. The only class I ever attended was a bread baking class and thankfully that was a step in the right direction.

IMG_2468 1

I love pesto – the nuttiness, the creaminess, the freshness of the sauce is to die for. I usually bottle up different sauces at home and stock it in my freezer for a rainy day.

IMG_2469

The rains are thundering outside and it was time to pull out the pesto and tackle Mr. Yeast. Baked a pesto and spiced cheese pull apart loaf that’s simply yum. Layered alternately with pesto and cheese spiced with oregano and chilli flakes.

Perfect with a cup of tea but didn’t have the patience to wait until evening, so finished half of it for lunch. 

IMG_2470

Pesto Ingredients

3/4 cup fresh basil leaves
1/2 cup grated Parmesan cheese
3 tbsp pine nuts
2 garlic flakes
1/3 cup olive oil
salt


  1. Add basil leaves, 1/2 cup Parmesan, pine nuts, salt in a food processer.
  2. Turn on the machine on low, then drizzle in olive oil while it mixes.
  3. Continue blending until combined adding additional olive oil if needed. Set aside 
Pull apart loaf Ingredients
2 cups Maida
3/4 cup luke warm water
1 1/2 tbsp Everyday milk powder
2 tbsp sugar
2 tsp Prime instant yeast
1 tsp salt
3 tbsp soft Amul butter
grated Brittania pizza cheese
red chilli flakes
oregano
sat
milk to spray
butter to brush
baking paper to line the tin
  1. Sieve the flour, add the salt, milk powder, sugar, yeast to it. Mix it well.
  2. Add the lukewarm water to the dry mix and mix it well.
  3. Use your table top to knead the dough, dust it with flour and gently start the kneading process.
  4. Do not put too much pressure. The movement starts from the top of your palms and stretch the dough to the bottom of your palm in a pushing motion, Light pressure only. Do not try to knead like chapati dough.
  5. Add the butter in instalments and keep on kneading. Little butter – knead – little flour to bind – knead – little butter and so on. Do not add extra butter or too much maida.
  6. Use a plastic scraper to help you get the dough together and continue to knead for about 15 mins.
  7. The dough tends to be sticky but will slowly come together towards the end. Do not overwork it. Pull out a small piece of the dough and stretch it. If it has elasticity and doesn’t tear easily, then your dough is ready.
  8. Place the dough in a lightly greased bowl. Grease the dough also.
  9. Take a wet cloth and heat it in the microwave for 30 seconds. Cover the dough with this cloth and leave it in a warm place for about 45 mins or till it has doubled in size.
  10. Line a bread tin with parchment paper to cover all sides.
  11. Gently deflate the dough and start rolling it out into rectangles. You can make circles also and cut out the sides to make a rectangle
  12. Lay 1 rectangle on the table top. Layer it with pesto sauce.
  13. Make another same size rectangle and place it on top of this one.
  14. Grate cheese on it, sprinkle oregano, chilli flakes and little salt.
  15. Continue the process, layer by layer  (about 5-6 layers).
  16. After the last rectangle sheet is placed, cut it lengthways as per the size of the tin.
  17. Pick one layer length and put it on top of the other.
  18. Then cut breadthwise to make smaller rectangles.
  19. Place them side ways in the tin in a row, leaving enough space for it to expand.
  20. Spray milk lightly and keep it back covered, in a dark place for another 45 mins – 1 hr (i left it in my switched off oven).
  21. It will double again, remove it from the oven and spray with milk again.
  22. Preheat the oven to 175-180 degrees C.
  23. Bake on the lowest rack for 20-25 mins. Do not keep the tin on the floor of the oven.
  24. Leave the tin in the oven for 5-10 minutes once done. Remove from the oven and brush with butter. Grate some cheese on top.
  25. When slightly cool, remove from the tin and discard the parchment paper. Its ready to serve.

Note – The temperature of my oven is on the higher side, so i usually bake for lesser time. Please set the time and temperature as per your individual ovens. plus minus 5.


Palak Paneer with Mini Kulchas

IMG_2052

Palak paneer is such a common dish. And it’s such a simple dish. But sometimes it’s the simple dishes that aren’t so easy to perfect.

IMG_2048

A friend of mine Prerna had given me her recipe a long time ago and till date it has never failed me. I use the softest creamiest paneer from Sind Punjab (yes I am ashamed to say that I have never made my own paneer yet) and that elevates the dish to another level.

IMG_2051

I wanted to make something different with the palak paneer and remembered Reem’s cheesy kulchas. Didn’t want cheese to clash with the paneer so searched for the plain ones. Her post said recipe from comment no 322 and I died. Took me a while to scroll but finally found it. The pictorial recipe was super easy and decided to give it a shot.

Made mini kulchas that were really yum and dunked them in the delicious palak with a piece of paneer. Heaven !

IMG_2049 1

PALAK PANEER

Ingredients

3 bundles of spinach

400 gms of paneer (Sind Punjab variety)

1 chopped big onion

1 chopped big tomato

2 green chillies

1 tsp jeera/cumin

1.5 tsp ginger garlic paste

1 tbsp dhania/coriander powder

1/2 tsp garam masala powder

salt


  1. Wash spinach leaves well. Put it in the cooker with  green chilli. No water. One whistle and keep on slow for 5 mins. Grind when cool. (Dont use any water except little of the water left in the cooker, only if needed)
  2. In a deep dish/kadhai, heat oil. Add cumin/jeera.
  3. When it sizzles, add chopped onion. Sauté it till pink.
  4. add ginger garlic paste. Brown it well.
  5. Add chopped tomatoes, and cook it till its soft.
  6. Add dhania powder and very little salt. Cook it till it leaves oil.
  7. Add  Garam masala and mix well.
  8. Add the palak mixture and cook for few mins. Adjust seasoning. (Palak gets salty easily, so be judicious)
  9. Add the paneer and give it one final mix. Serve hot.

IMG_2050

KULCHAS (Recipe by Reem Khan – verbatim except for the yeast part as my yeast didn’t need proofing)

Ingredients


2 cups APF/maida
1 cup milk (warm, 1 minute on full power in the microwave)
1 tsp yeast (Prime)
1 1/2 tsp sugar
3/4 – 1 tsp salt
1 tbsp ghee or olive oil
25 ml water
FOR TOPPING

1 tbsp grated or coarsely ground garlic
Til
Kalonji
Chopped dhania
Finely sliced green chillies
Butter to brush just before serving

Add flour, yeast, sugar and salt to a bowl, and pour 1 cup warm milk on it.

Start mixing it all together. It will be a sticky dough by the time it all comes together. Keep kneading and folding it in for about 5 mins. It will start to form a semblance of a dough.

Take a little ghee/oil on your hand and start folding the dough from the edges to the centre. All the gooey dough will come off, keep moving the ball of dough on the edges also to take all the dough in. Pull the edge and bring it inward.

Now turn the ball over putting the pinched folds underneath. Transfer it to a greased bowl.

Grease the bowl and the dough well before putting it to rise. This is very important, or else when the dough rises, it will stick to the edges and working with it later will be very messy.

Take a clean tea towel. Sprinkle enough water on it to make it damp. Ball it up and put it in the microwave for 25 seconds.

Now cover the bowl of dough with this warm towel and keep it in a dark, warm place for an hour, or till it doubles up.


Preheat the oven to 190C for 10 minutes. Cover a baking tray with aluminium foil and grease it well.
To make the Kulchas, use a silicon mat and grease it well.
Lightly grease your hands and pinch out a golf ball size of the dough.
Put it on the greased sheet, and again start folding from the edges inwards. Pinch, pull and fold.
Turn it so that the smooth side comes up


Now start patting and pushing the dough outward, to stretch it, but make sure it has even thickness, Make the desired shape
Dab little water,  sprinkle some kalonji and til over the discs.
Now pat some ground/grated garlic.
Chopped dhania, and if you like, sliced chillies

Now press your fingers and make indentations

Lift the plastic from one end and gently take the Kulcha off. Place it on the greased foil

Place the tray on the middle rack in the oven and bake at 190° C till you get the desired colour. ( Appx about 6-7 minutes).

Once the top is done, remove the tray and transfer the Kulcha on to the wire rack, and bake it on the bottom rack for a minute
They should have a hollow sound when you knock the bottom

As soon as you take them out, brush with salted butter. Serve hot

Baileys Cupcakes with Nutella centers and ganache

IMG_1974

I love celebrating occasions whether small or big. Now that I can bake, I never miss a chance to cut a cake or in this case a cupcake.

IMG_1976

In this virtual world, we meet so many people but none have clicked as much as this crazy gang of girls and a guy. Today we completed 1 month since we first met and in this one month we have become as close as family. Chatting non stop, meeting at the drop of a hat and supporting and encouraging each other.

IMG_1975

This post is dedicated to my mad gang of Sonam Puesh AjmaniTheresa KripalaniGrace James DoddiApeksha MehtaRinky MistrySahana Shivprasad ShettyShetty SneHaRaJ ShethSwati KarnadVini Changlani and Zarna Adhyaru

This recipe is adapted from The Big book of Treats

IMG_1977

Ingredients

1/2 cup butter

1/2 cup brown sugar

2 eggs

3/4 cup flour

1/4 cup coca powder

1 tsp baking powder

40 ml Baileys Irish cream

100 gms Nutella

Nutella chocolate ganache

Sprinkles


  1. Pre heat the oven to 175C.
  2. In a bowl, whisk together the butter and brown sugar till its well blended.
  3. Add the eggs one by one till soft and fluffy.
  4. Sift together the flour, cocoa powder and baking powder
  5. Fold the dry mixture into the wet mixture with a spatula.
  6. Add the Baileys and mix it in
  7. Line a cupcake tray with liners and pout the batter to about 2/3 full.
  8. Bake at 175C for 12-15 mins or till a toothpick comes clean
  9. Once the cupcakes have cooled, make a hole in the middle of each cupcake with a knife and spoon it out.
  10. Fill the holes with Nutella and leave it in the fridge to set for 30 mins.
  11. Pipe the Ganache as per your preference and add sprinkles for affect.


Chocolate cake layered with mousse with a white chocolate frosting

IMG_1741

It’s my besties son’s birthday and I really wanted to make a cake for him.

When I asked what type of cake he wanted, he said a rainbow cake. Not yet attempted a rainbow cake so I immediately asked him for option B. So he said white chocolate. Eeeks. Now I hate white chocolate as find it overly sweet and was flummoxed as his mom said, try to make it less sweet.

IMG_1743

So decided that I would make a chocolate cake with a dark chocolate mousse filling and a white chocolate ganache mixed with whipped cream for the frosting. Added some cake pops on top for those who don’t like too much of white chocolate.


A gorgeous colour combination and a rustic look makes this cake stand apart.

Ingredients:

IMG_1744 1

For the basic Chocolate Sponge Cake:

4 eggs

1 1/4 cup sugar

1 cup all purpose flour

3/4 cup butter

1/2 cup cocoa powder

1 tsp vanilla essence

2 tsp baking powder


  1. Grease and dust 8″ cake pan. Pre heat the oven to 175C.
  2. Sieve the flour, baking powder and cocoa together.
  3. Beat the butter and sugar very well until thick and well combined.
  4. Add eggs gradually, and keep beating the mixture till it is mixed well and is fluffy. Gradually add in the dry ingredients and fold inslowly. Do not overbeat the mixture.
  5. Pour the mixture into the prepared tin.
  6. Bake in a hot oven at 175C for 30 minutes or till a toothpick comes out clean.
  7. Once the cake is baked, put it on a wire stand and let it cool.

For the chocolate mousse layer:

Dark Chocolate 2 cups (chopped)

Amul Cream 1 cup

Butter 2 tbsp

3/4 cup whipped cream


  1. To make the chocolate mousse, roughly chop the dark chocolate and set aside.
  2. In a pan, add the Amul cream and put it to boil. Once the cream just starts boiling, remove from heat and add in the butter.
  3.  Gently spread the hot cream over the chocolate pieces so that everything is evenly covered. Let this sit for 5-7 minutes.
  4.  After 5-7 minutes, take a whisk and whip the contents till you get a smooth creamy mixture. Make sure no lumps of chocolate remain in the ganache.
  5. Cool the ganache and add in the whipped cream a little bit at a time. Mix well and add whipped cream as per the texture and consistency you prefer.
  6. Keep it in the fridge for 20-30 mins

For white chocolate frosting:

3 cups white chocolate/compound

1 cup Amul cream

1/2 cup whipped cream

Candy colour of your choice


  1. To make the chocolate ganache, roughly chop the white chocolate and set aside.
  2. In a pan, add the Amul cream and put it to boil. Once the cream starts boiling, remove from heat and add to the chocolate.
  3.  Gently spread the hot cream over the chocolate pieces so that everything is evenly covered. Let this sit for 5-7 minutes.
  4.  After 5-7 minutes, take a whisk and whip the contents till you get a smooth creamy mixture. Make sure no lumps of chocolate remain in the ganache.
  5. Cool the ganache and add in the whipped cream a little bit at a time. Mix well and add whipped cream as per the texture and consistency you prefer
  6. Add a few drops of colour as per the shade you need. And whisk it well.
  7. Leave it out to set (do not keep in the fridge) and whisk at intervals. Make atleast 2 hours before assembly

Assembly:

Sprinkles of your choice

Cake pops

2 tsp powdered sugar for the syrup


  1. Divide the cake into 2 parts horizontally.
  2. Make a syrup by mixing 1/2 teacup of water with 2 teaspoons of powdered sugar.
  3. Using a silicon brush, sprinkle a little syrup over the two cake parts and allow them to soak. Repeat after 10 minutes.
  4. Take a serving platter and put one piece of cake on it. Layer it thick with the chocolate mousse icing.
  5. Place the top part of the cake and apply a thin coat (crumb coating) of white chocolate frosting, covering each side of the cake.
  6. Keep the cake in the fridge for 30 mins to set.
  7. Coat the cake generously with the white chocolate frosting after 30 mins.
  8. To garnish, decorate the cake with sprinkles and cake pops.
  9. Keep the cake in a refrigerator for 2 hours before serving

Lemon almond tea cake

IMG_1770

A quiet corner, rains threatening to drench everything but the sun still not ready to give up. A favourite book, a hot cup of lemon tea and a generous slice of moist lemon almond cake. And just because I feel like it, a dollop of whipped cream on the side. Pure bliss.

IMG_1769

This cake is tangy and nutty and moist and delicious. Superlative from all angles. It’s from Pooja Dhingra’s The Big book of treats and a really easy recipe to follow.

IMG_1768

Ingredients

125 gms butter

125 gms castor sugar

2 eggs

100 gm maida

1 tsp baking soda

50 gms ground almonds

1 tsp lemon zest

5 tsp lemon juice


  1. Preheat the oven to 165C.
  2. Whisk the butter and castor sugar till thick and creamy.
  3. Add the eggs one at a time and whisk till well combined.
  4. Sift the flour and baking soda together and fold it into the mixture.
  5. Add the ground almonds, lemon zest, and lemon juice and fold it in gently.
  6. Bake in a 250 gms lined loaf tin at 165C from 20-25 mins

IMG_1767